Leaderboard


Popular Content
Showing content with the highest reputation since 09/25/24 in all areas
-
We will look into this issue deeply soon.3 points
-
New option: soCleanGlobalCache3 points
-
This is exactly what I need, thank you SO MUCH. @Sherzod @picyka2 points
-
Well, if I understand you correctly, it sounds like the issue you're encountering is due to the fact that in the onready event, not all of the UI components have been fully rendered or initialized, which can lead to Ajax issues, especially when trying to interact with components like UniDBGrid. When you use the aftershow event on a form, the rendering is typically more complete, which explains why it works better in that case. Use afterrender, afterlayout, boxready events. If you are interacting specifically with a UniDBgrid, you might want to ensure that the grid is fully rendered before making the request. You can hook into events specific to the grid, such as store.load or viewready events.2 points
-
Hi, The .tar.gz is useful for setting up the uniGUI runtime+ themes in a Linux environment or when you need to manually install the runtime without using .exe installers (but you can also use in Windows too).2 points
-
Is very easy to integrate. Is not even a question of uniGUI versus WebRTC but what you want to do with it. In few day releasing a new project with image and video recording with WebRTC. By the way, it works with just an uniurlframe. Place some JS and its done. note: I mean the WebRTC part ! Not the SIP / Signal.1 point
-
Hi, For HyperServer we don't disable the feature completely, instead we control access by assigning users to server monitor. By default it asks for user name and password. prompt_login=1 [login-0] user_name= password= admin=01 point
-
[UNG-3557] - Issue when session incoming requests are queued too fast. Would this be an improvement?1 point
-
Hi @Farshad Mohajeri, I checked with your suggestion and put greate effort to locate it. Thanks as always.1 point
-
FARSHAD, please add this feature. I have all the code shown below. Works nice. I wanted a /d switch to force desktop mode, just like /m forces mobile mode. I searched and searched and only found one mediocre solution. It required that you change the ServerModule.UniServerModule.Options:=serverModule.UniServerModule.Options-[soAutoPlatformSwitch]; P:=the URL without the /m so that it loads the Desktop version UniSession.UrlRedirect(P); With this logic, it mostly worked, but would hang sometimes. Also, it changes the way the server operates. IE: If ANOTHER user logs in on another session, there would be NO AUTO DETECT FOR THE PLATFORM SWITCH So, i discarded it. Also, there are a number of sites that describe how to get the iPad Safari to force desktop mode. My OLD iPad didn't have the available setting to do that AND if it DID work, it would force ALL web sites to use the desktop version. Couldn't make it site specific, like you can in chrome. The solution needs to EASY and not mess up other web sites... and not hang... and not mess up with the auto platform switching. SOOOOOooo, i added a new switch. I added the "/d" switch. Much like the /m forces the mobile mode, the /d forces the desktop mode. THis magic is done in the uniGUIServer.pas file. And inside the GetUniGUISession function. Add this in vars. ForceDeskTop:Boolean; //DLR Then add the ForceDesktop:=False in between the FServerMonitor and SessionClass initializations. FServerMonitor := False; ForceDeskTop:= False; // DLR SessionClass := TUniGUISession; Then after the check for the 'server' switch, add the check for the /d switch... ADoc := uniHTTPDocument(ARequest.Document); FServerMonitor := SameText(ADoc, 'server') and FAllowWebMonitor; if FServerMonitor then begin ARequest.Document := '/'; ADoc := ''; end; { DLR - Check for the /D switch } ForceDeskTop:= SameText(ADoc, 'd'); if ForceDeskTop then begin ARequest.Document := '/'; ADoc := ''; end; The final piece of the puzzle is to bypass the auto switch. So, place the new code after setting the ForceMobile variable. ForceMobile := (not Assigned(MainFormClass[TUniPlatformDesktop])) or ( (soAutoPlatformSwitch in FOptions) and (currPlatform = upMobile) ); { DLR Should i get rid of ForceMobile? } If ForceDeskTop Then ForceMobile:=False; So, essentially, if i find the /d then i ignore the auto switch. This allows for 3 ways to load the application... 1. somesite.com/mdemo.dll works for most cases and devices. 2. somesite.com/mdemo.dll/m allows you to force it show the MOBILE forms 3. somesite.com/mdemo.dll/d allows you to force it show the DESKTOP forms I know this is not elegant, but gives the "force desktop" capability without messing around with the server options that can affect other sessions. And you don't have to mess around with browser settings. To me this was the best solution. FARSHAD: Could you please add this /d capability so that others can also make use of this? 95% of the time the auto works great. But for iPads and tablets that are large enuf, its nice to view the DESKTOP version even though the stupid browser on the device might indicate that it's a mobile device. Make sense? Thanks DAvie1 point
-
Well, for example like this:1 point
-
@Sherzod My mistake. I should have written "afterrender" of course. Now it works. Thanks a lot, I am happy.1 point
-
@Sherzod Amazing, thank you!!!1 point
-
1 point
-
EurekaLog DevSulAssist_WIN-EM5F97TDNDI_20241011081633.el DevSulAssist_WIN-EM5F97TDNDI_20241011081634.el DevSulAssist_WIN-EM5F97TDNDI_20241011081635.el DevSulAssist_WIN-EM5F97TDNDI_20241011081636.el DevSulAssist_WIN-EM5F97TDNDI_20241011081637.el DevSulAssist_WIN-EM5F97TDNDI_20241011081638.el1 point
-
see the last example1 point
-
Hello, This will be fixed in the next build.1 point
-
Thanks @eduardosuruagy, I will test it and get back to you here.1 point
-
@Sherzod, what do you think about having an event in the frame in the next version that only fires after everything is rendered like it is in UniForm?1 point
-
Сделаю1 point
-
1 point
-
@Farshad Mohajeri, Since it is a seemingly random error, perhaps more information could be added to the capture and error message that would make it possible to identify the origin/cause of the problem?! Yesterday I faced this problem and found out it was due to the use of: Self.Showmask('Opening option...'); UniSession.Synchronize; CreateNewFrameAndAddOnNewTab('FrameName', ....); FrameName inherits from a FrameBase, that is, it is a heavy frame with many components and Queries, after removing UniSession.Synchronize() or adding the timeout to it UniSession.Synchronize(250) the problem stopped.1 point
-
In my case, I'm trying to remove/replace some characters and I don't want them to reach the browser console. I don't want it to be visible in the google console (F 12 ) and for that only the keydown event works for me. Your case maybe a different.1 point
-
Hi, I catch what user write on tuniEdit Field via keydown. If this can help try it. You must to know: 1. work on Desktop Devises all browsers - no problem 2. work on mobile Devices all browsers - no problems function keydown(sender, e, eOpts) { function pad(num, size){ return ('0000000000' + num).substr(-size); }; var getKeyCode = function (str,i) { switch (i) { case 0 : return str.charCodeAt(str.length - 1); case 1 : return str.charAt(str.length - 1); }; }; var val = sender.getValue(); var allowed = '!@#$%^&*_=.,/-[]{}|№"' + '0123456789' + 'zxcvbnmasdfghjklqwertyuiop' + 'ZXCVBNMASDFGHJKLQWERTYUIOP' ; if (event.key != "Unidentified") { var c = event.key.charCodeAt();//event.code;//event.code;//e.keyCode || e.which;//e.getCharCode();//e.keyCode; var k = event.key; } else { var c = val.charCodeAt(val.length-1);//getKeyCode(val,0); var k = val.charAt(val.length-1);//getKeyCode(val,1); } if (allowed.indexOf(k) > -1 ) { //sender.setValue(NEWValue); //Cancel the event //event.stopEvent() ; event.preventDefault(); //event.stopPropagation(); //event.stopImmediatePropagation (); }; }1 point
-
If you are interested, you can check out my component of Signature. https://store.falconsistemas.com.br/?locate=Signature Demo (https://demos.falconsistemas.com.br/?tela=tfrmsignature) Uses Smoother technology (https://developer.squareup.com/blog/smoother-signatures/)1 point
-
var s: string := url; // oauth2 Unisession.AddJS('setTimeout(function(){window.open("' + s + '", "_blank")}, 100)'); numMsWaited := 0; while (numMsWaited < 30000) and (CkOAuth2_getAuthFlowState(oauth2) < 3) do begin CkOAuth2_SleepMs(oauth2,100); numMsWaited := numMsWaited + 100; end;1 point
-
Works as expected, thank you!1 point
-
There are two types of cache in uniGUI. Global cache and session local cache. Session local cache is erased automatically when session is terminated. Global cache is not deleted, so it can be reused when application restarts.1 point
-
Thank you Maeastro1 point
-
The problem is that you are overwriting your CSS import with the ServiceWorker code. To Fix: In procedure TUniServerModule.UniGUIServerModuleCreate replace the statement CustomCSS.Text = sData with CustomCSS.Text = CustomCSS.Text + sData Thaty will fix it.1 point
-
Hello @jrp We will analyze it, try this solution for now. procedure TMainForm.UniButton1Click(Sender: TObject); begin //if UniDateTimePicker1.IsBlank then if UniDateTimePicker1.DateTime = 0 then ShowMessage('Blank') else ShowMessage('Not blank'); end;1 point
-
@Marlon Nardi Thank you for your assistance, it is greatly appreciated. As a token of my appreciation, I have also purchased the UniFalcon Package.1 point
-
@morphine Added support for Delphi 12 Athens1 point
-
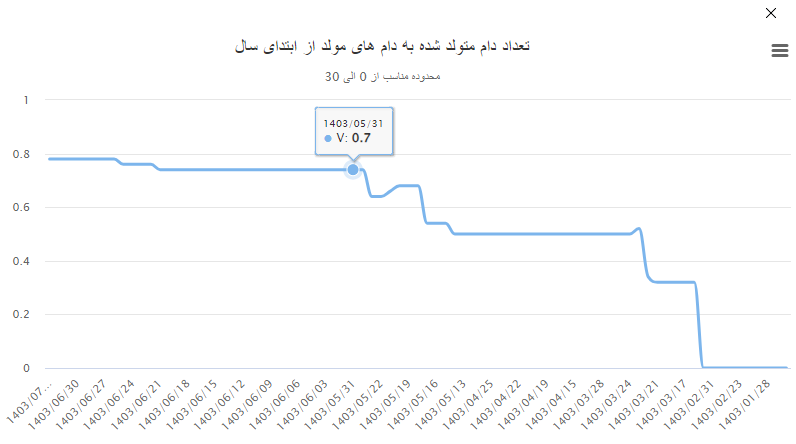
A simple procedure to draw chart 1- Create a runtime UniForm (+ A UniPanel or any parent ) as ChParent 2- Do a query, Put data in a for example Virtual table 3- Call this function procedure TMainform.DrawMyChart(TTl,Sub,XATTl : WideString; // Main title , Sub Title , X Title InTable : TVirtualTable; // I Put data in devart VirtualTable And passed to Chart... you can change it InChartType :TChartType; // Below comment InTheme :TTheme; // Below comment ChParent : TWinControl // Where you want to show chart ); // TChartType = (ctArea, ctAreaRange, ctAreaSpline, ctBar, ctBoxPlot, ctBuble, // ctColumn, ctColumnRange, ctErroBar, ctFunnel, ctGauge, ctLine, // ctPie, ctScatter, ctSpline, ctWaterFall, ctSeries, ctStreamgraph); // TTheme = (tDefault, tDarkBlue, tDarkGreen, tDarkUnica, tGray, tGrid, // tGridLight, tSandSignika, tSkies, tCustom); var Serie: TSerie; I : Integer; TestChart : TUniSFChart; begin if Not InTable.Active then InTable.Open; if InTable.RecordCount=0 then Exit; TestChart:=TUniSFChart.Create(ChParent); With TestChart Do Begin Parent:=ChParent; Name:='TestChart'; Align:=alClient; Theme := InTheme; credits.enabled := False; // ---------- you can change chart env or ignore this section // credits.href := 'https://M88.ir'; // credits.text := 'Modiran'; lang.contextButtonTitle := 'منوی گرافیکی'; lang.downloadJPEG:='JPG'; lang.downloadPDF:='PDF'; lang.downloadPNG:='PNG'; lang.downloadSVG:='SVG'; lang.downloadSVG:='SVG'; lang.loading:='بارگذاری..'; lang.printChart := 'چاپ'; lang.resetZoom := 'بزرگنمایی>برگشت'; lang.resetZoomTitle := 'بزرگنمایی 1:1'; lang.decimalPoint := '.'; lang.thousandsSep := ','; // ---------- you can change chart env or ignore until here End; with TestChart do begin DataSet:=InTable; title := TTl; SubTitle := Sub; legend.layout := lVertical; legend.align := aRight; legend.verticalAlign := vaMiddle; legend.borderWidth := 0; with xAxis.add do begin FieldName := InTable.Fields[0].FieldName; // First Column xAxisType := atCategory; end; with yAxis.add do begin title := XATTl; end; for I := 1 to InTable.FieldCount-1 do Begin Serie := Series.add; Serie.ChartType := InChartType; Serie.FieldName := InTable.Fields[I].FieldName; Serie.tooltip.valueDecimals := 1; Serie.tooltip.shared := false; End; Draw; // Draw it end; end;
 1 point
 -
Sharing here for visibility1 point
-
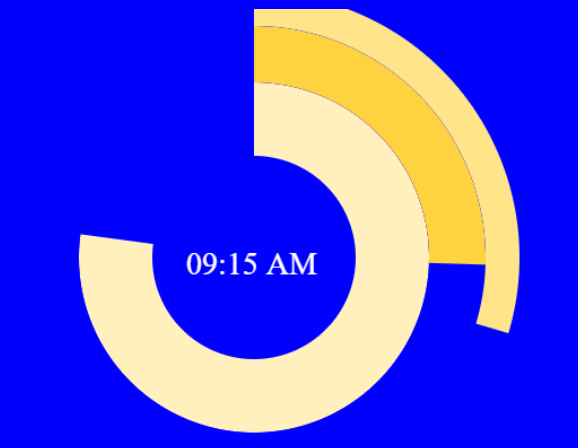
put (or create at runtime) a htmlframe and insert this code to make a clock <!DOCTYPE html> <html lang="en"> <head> <style> body { background-color: #0000ffff ; text-align: center; color: #0000ffff ; font-family: 'Poppins', sans-serif; overflow: hidden; } canvas { width: 100%; Height: 100%; margin: 0px auto; display: block; } a { color: #0000ffff ; transition: linear 0.3s; } a:hover { opacity: 0.8; } </style> </head> <body> <canvas id="canvas"></canvas><br> <script> const ctx = canvas.getContext('2d'); const threePIByTwo = (3 * Math.PI) / 2; console.log(threePIByTwo); let amOrPm = 'AM'; const canvasBg = '#0000ffff'; // Define colors for hour, minute and second hand const hourActiveColor = '#FFF0BE', minuteActiveColor = '#FFD340', secondActiveColor = '#FFE48A'; // Define inactive colors for hour, minute and second hand const hourInactiveColor = '#0000ffff ', minuteInactiveColor = '#0000ffff ', secondInactiveColor = '#0000ffff '; const timerBg = '#0000ffff '; function init() { canvas.width = document.documentElement.clientWidth - 35; canvas.height = document.documentElement.clientHeight - 45; // This calls the draw function repeatedly at a rate of 60 times per second window.requestAnimationFrame(draw); } function draw() { // Finding center point of canvas const centerX = canvas.width / 2, centerY = canvas.height / 2; const date = new Date(); let hr = date.getHours(); let min = date.getMinutes(); let sec = date.getSeconds(); let ms = date.getMilliseconds(); if(hr > 12) { amOrPm = 'PM'; hr -= 12; } /* Defines how much radians each hand should move */ let radH = 0.000008333 * ( ( hr * 60 * 60 * 1000 ) + ( min * 60 * 1000 ) + ( sec * 1000 ) + ms ); let radM = 0.0001 * ( ( min * 60 * 1000 ) + ( sec * 1000 ) + ms ); let radS = 0.006 * ( ( sec * 1000 ) + ms ); // Draw Canvas drawRect(0, 0, canvas.width, canvas.height, canvasBg); // Hour Hand drawCircle(centerX, centerY, 110, 0, 360 , false, hourInactiveColor, 'stroke', 90); drawCircle(centerX, centerY, 110, threePIByTwo, rad(radH) + threePIByTwo, false, hourActiveColor, 'stroke', 90); // Minute Hand drawCircle(centerX, centerY, 180, 0, 360, false, minuteInactiveColor, 'stroke', 50); drawCircle(centerX, centerY, 180, threePIByTwo, rad(radM) + threePIByTwo, false, minuteActiveColor, 'stroke', 50); // Second Hand drawCircle(centerX, centerY, 220, 0, 360, false, secondInactiveColor, 'stroke', 30); drawCircle(centerX, centerY, 220, threePIByTwo, rad(radS) + threePIByTwo, false, secondActiveColor, 'stroke', 30); // Digital Timer drawCircle(centerX, centerY, 90, 0, 360, false, timerBg, 'fill', '50'); drawText(`${hr.toString().padStart(2, "0")}:${min.toString().padStart(2, "0")} ${amOrPm}`, canvas.width / 2 - 60, canvas.height / 2 + 15, '#ffffff', '28px'); window.requestAnimationFrame(draw); } init(); // Convert degree to radians function rad(deg){ return (Math.PI / 180) * deg; } function drawText(text, x, y, color, size) { ctx.font = `${size} "Poppins"`; ctx.fillStyle = color; ctx.fillText(text, x, y); } function drawRect(x, y, width, height, color) { ctx.fillStyle = color; ctx.fillRect(x, y, width, height); } function drawArc(x, y, radius, start, end, clockwise) { ctx.beginPath(); ctx.arc(x, y, radius, start, end, clockwise); } function drawCircle(x, y, radius, start, end, clockwise, color, type, thickness) { switch (type) { case 'fill': ctx.fillStyle = color; drawArc(x, y, radius, start, end, clockwise) ctx.fill(); break; case 'stroke': ctx.strokeStyle = color; ctx.lineWidth = thickness; drawArc(x, y, radius, start, end, clockwise) ctx.stroke(); break } } </script> </body> </html>
 1 point
 -
Extract content in resources folder Including in Server Module, Property Custom Files: ext-x.x.x.xx/resources/ext-theme-azzurra/js/azzurra.js x.x.x.xx = version of extjs Azzurra Ungui resources.rar1 point
-
Same, exproting do html.1 point
-
Hello, You can try this approach: procedure TMainForm.UniFormCreate(Sender: TObject); begin with UniPageControl1.ClientEvents.UniEvents do begin Values['tabPanel.beforeInit'] := 'function tabPanel.beforeInit(sender, config){config.tabPosition = "right"; config.tabRotation = 0;}'; end; end;
 1 point
 -
uniGUI - Favicon "Madness" FavIconMadness.mp4 Features Almost all you can do with favicon in "all-in-one" example project. All Javascript code integrated to uniGUI Give another professional look to your app Very easy to modify and customize No third party components. All source-code included for Delphi/Pascal/uniGUI. No hidden costs or fees. Yes, we offer advice on adapting any of these examples to your systems. Contact us to receive a quote. See more detail at link below: https://www.unigui.com.br/FavIconMadness.html1 point
-
Hello, One possible solution: 1. ... function showPosition(position) { x.innerHTML = "Latitude: " + position.coords.latitude + "<br>Longitude: " + position.coords.longitude; top.ajaxRequest(Ext.get(document.getElementById('uniqueFrameID')).component, 'coords', {latitude: position.coords.latitude, longitude: position.coords.longitude}); } ... 2. procedure TMainForm.UniFormCreate(Sender: TObject); begin UniHTMLFrame1.JSInterface.JSConfig('id', ['uniqueFrameID']); end; 3. procedure TMainForm.UniHTMLFrame1AjaxEvent(Sender: TComponent; EventName: string; Params: TUniStrings); begin if EventName = 'coords' then ShowMessage(Params.Values['latitude']) end;1 point
-
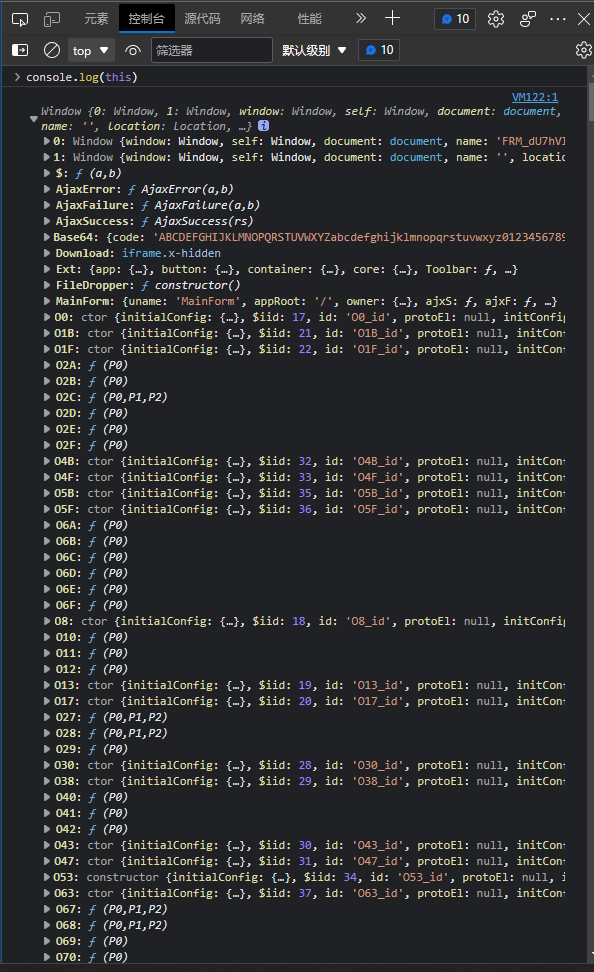
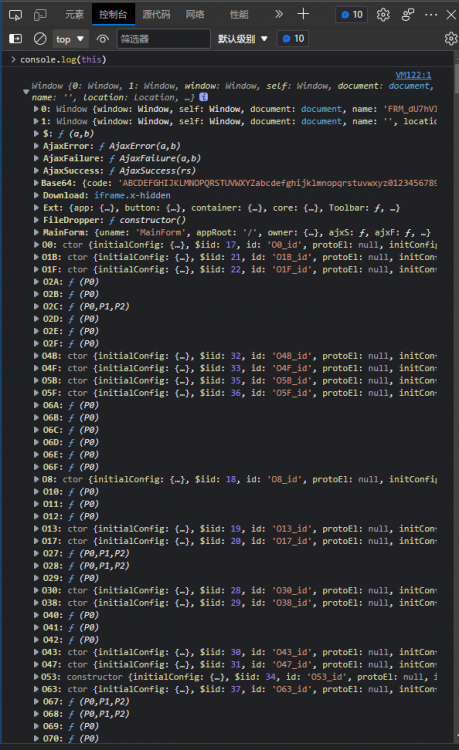
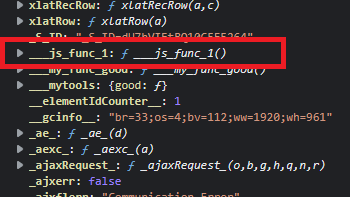
The world is "Tree" . Run unigui app, open url in browser, and the developer-tool will tell you what is inside it. Type and run “console.log(this)” in developer-tool. (This pic shows how current session objects are organized like a tree inside the browser vm , and "this" is a "Window" type object. ) Every object may have a name ,like O6A,O10....... and MainForm. When you include an outside js file,it's content will append to the "Tree". Example ,we define a function in file "jsfunc.js", function ___js_func_1(){ alert("call js_function"); } and add "/files/jsfunc.js" to servermodule.customfiles. When uniapp initialized, the function "___js_func_1" will append to the object tree (this is "Window"). Or we put an TUniHTMLFrame on a UniForm, set HTML property with: <head> <script> function ___my_func_good(){ alert('good'); } // function append to "Window" var ___mytools={}; // object append to "Window" ___mytools.good=function (){ alert('good'); } //function append to "Window".___mytools </script> </head> <body> hello<br> <input type="button" value="click good" onclick="___my_func_good()"></input> </body> At runtime, "___my_func_good" and "___mytools" will append to the tree (this is "Window"), like pic shows. Usually,we just simple call "this.___js_func_1()", "this.___myfunc_good()" and "this.___mytools.good()". Unisession.AddJs('this.___js_func_1();'); You can add any new child object(or function) to any object on the tree, so it is important to make sure what is "this". If you dynamic create js objects or functions in runtime , you may consider how to organize them on the "Tree"
 1 point
 -
"retired from coding" is already a strange statement, but locking or delete all of already published videos is another thing... and not nice.1 point
-
Updated login demo, now works for Google, Azure and Twitter, enjoy ! SignIn_Demo.zip1 point
-
Oliver Morsch is right, it is working nicely with long polling on the Unigui server, and then the connection will be outbound and no router/NAT issues at all. Attached is a simple setup illustrating this. Then it is all about making the local service run without a hitch - and that is not a Unigui problem I will also propose a namechange: - Uniguni UNIque Graphical User Networking Interface. A little tounge in cheek, of course, but also the chance to launch a press release and define a new term - everybody loves terms. Besides, it is easier to say...and can by time expand to UniGuniLuni, or whatever...the sky is the limit ! polling.zip
 1 point
 -
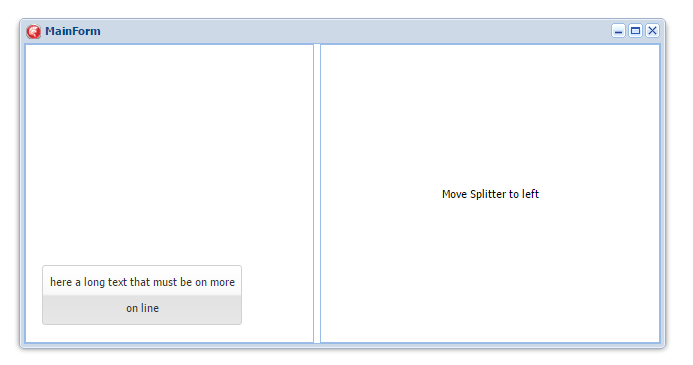
Here is a modified version of Delphi Developer's solution which scales the number of lines dynamically...obviously there is only so much space to fit eventually. function resize(sender, width, height, oldWidth, oldHeight, eOpts) { var me = sender.btnInnerEl; var tm = new Ext.util.TextMetrics(); var lineHeight = parseInt(me.getStyle("line-height")); var textWidth = tm.getSize(sender.text).width; if (textWidth >= width + 25) { me.setStyle("line-height", lineHeight / Math.ceil(textWidth/width) + "px"); me.setStyle("white-space", "normal"); } else { me.setStyle("white-space", "nowrap"); }; }
 1 point
 -
function TPaginaPrincipal.TextWidth(s: TUniLabel): Integer; var c: TBitmap; f: TFont; begin { uma forma de calcular o tamanho de um texto na janela se o canvas não atualiza via ajax } c := TBitmap.Create; f := TFont.Create; Result := 8 * Length(s.Caption); f.Height := s.Font.Height; f.Size := s.Font.Size; f.Name := s.Font.Name; f.Style := s.Font.Style; try c.Canvas.Font.Assign(f); Result := c.Canvas.TextWidth(s.Caption); finally c.Free; end; end;1 point
-
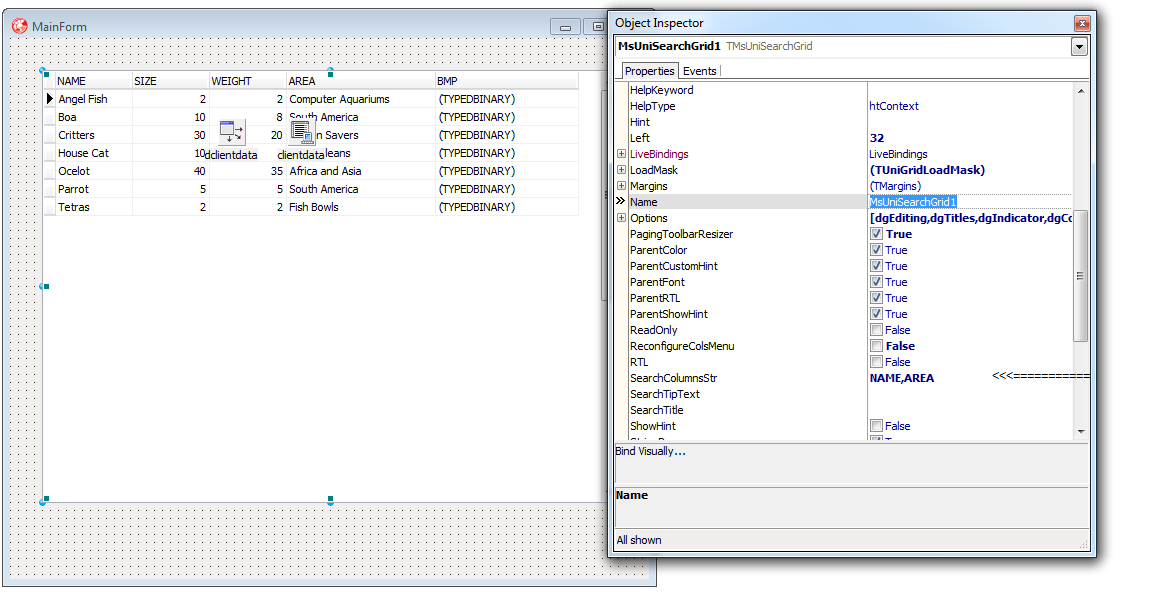
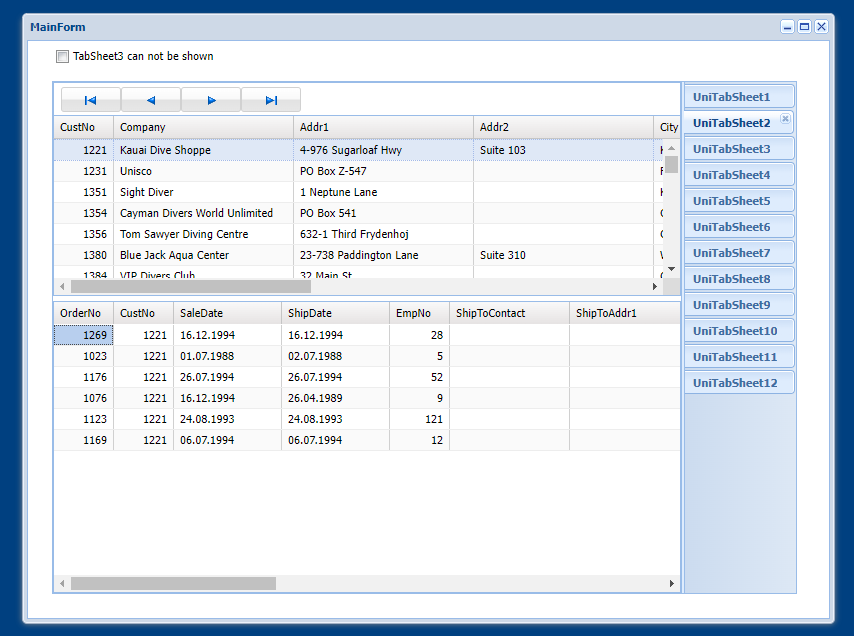
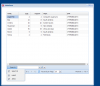
Hi, A new feature -Plugin for UniDbGrid : Searching.js Before Use, First please read carefully the license of searching.js I do not think there are problems, but the author has a paid version for Extjs 5. (Sencha Market) . I have made some changes, the original version does not work with Unigui. . I added the following properties to the new uniguidbgrid: ** FPagingToolbarResizer : boolean; ** FSearchColumnsStr : string; FReconfigureColsMenu : boolean; FTrigger1ButtonTip : string; FTrigger2ButtonTip : string; FTrigger3ButtonTip : string; FSearchTitle : String; FSearchTipText : String; As you can see from the pictures that I attach, you can define 3 triggerbuttons: the first two are standart. 1) Clear Search 2) Search 3) Reconfigure Search Menu Fields. (optional) . Each triggerbutton has its own tooltip . if FPagingToolbarResizer Set to true (default), I use the Plugin -PageSize Extension for UniDBGrid- posted by Delpi Developer. if FReconfigureColsMenu Set to true (default is false) you get 3 triggerbuttons. There are 3 ways to create the "Search fields Menu" 1) Define Columns (TunidbgridColumns) in unidbgrid 2) use the property FsearchColumnsStr in the following form: for example: NAME,AREA NAME,AREA are Fields . fields must be separated by commas 3) After runnging, click then Trigger3Button : Reconfigure Search Menu Fields. ** FReconfigureColsMenu must set to true. In your new programs, copy to ServerModule-CustomCss: x-form-std-trigger { cursor: pointer; overflow: hidden; background-repeat: no-repeat; } add to ServerModule-CustomFiles: files/PagingToolbarResizer.js copy to files folder PagingToolbarResizer.js . The attached demo that does not have many data, sorry. To avoid this message at first running : newgridx: 00000B28: 12:59:01 [HandleFileRequest]:File not found: C:\Program Files\FMSoft\Framework\unigui\ext-4.2.1.883\src\ux\grid\feature\Searching.js in the zip file you will find a -src- folder, copy to C:\Program Files\FMSoft\Framework\unigui\ext-4.2.1.883\ ' C:\Program Files\FMSoft\Framework\unigui\ext-4.2.1.883\ ' is the folder where I installed Unigui, your maybe different. I hope it's everything. P.s. tested only with Delphi XE3 and Unigui 096... ======================================================== package MsSearchGrid; requires rtl, vcl, UniGUI17; // 17 = Delphi XE3 . Change with your Delphi Release contains MSUniSearchGrid in 'MSUniSearchGrid.pas'; end. ======================================================== 1) Build and Install package. 2) Compile and running demo program. searchgrdid.zip Have fun Best regards. Salvatore Marullo,

 1 point
 -
Thanks, is Working Good now!!!1 point
-
Not a component for UniGUI, but a good component to use in UniGUI. My current web application needs basic reporting features, so I use this instead of other reporting solutions. So, if anyone needs to export or print a dataset using basic commands, this can help. This component exports any linked dataset to HTML, in disk, then you can show a UniHTMLFrame of it and print. Working here for IE, Chrome and Firefox. The component is attached. Bye! Bruno Lovatti Use like this: procedure TUniFrameInv.CreateHTML(fname: string); begin ToHTML.HTML.Clear; ToHTML.PageOptions.Title := 'Produtos'; ToHTML.PageOptions.Header := 'Produtos da Extrafruti para Inventário <br>' + '<br> LOJA: ' + TrimRight(UniCBoxLoja.Text) + '<br> DATA: ' + FormatDateTime('dd/MMM/yyyy - hh:mm:ss',now) + '<br> ENCARREGADO: ' + UniMainModule.UsuarioLogado; if FileExists(fname) then try SysUtils.DeleteFile(fname); except // end; //ToHTML.PageOptions.Footer := FormatDateTime('dd/MMM/yyyy - hh:mm:ss',now); ToHTML.FileName := fname; // script - test (*ToHTML.Script.Add('<script type="text/javascript">'); ToHTML.Script.Add('$(function(){'); ToHTML.Script.Add(' printPage();'); ToHTML.Script.Add('});'); ToHTML.Script.Add(' function printPage() {'); ToHTML.Script.Add(' focus(); print(); }'); ToHTML.Script.Add('</script>');*) // accents for brazilian portuguese ToHTML.Meta.Clear; ToHTML.Meta.Add('<meta http-equiv="content-type" content="text/html; charset=ISO-8859-1" />'); ToHTML.Meta.Add('<meta http-equiv="cache-control" content="no-cache" />'); ToHTML.Meta.Add('<meta http-equiv="pragma" content="no-cache" />'); ToHTML.CreateHTML; //ToHTML.SaveHTML; end; Example of call: fname := AppPath + 'impressao\PROD_' + FormatDateTime('dd.mm.yyyy_hh.mm.ss',now)+'_'+ TrimRight(UniCBoxLoja.Text)+'.html'; CreateHTML(fname); And the events like this: procedure TUniFrameInv.ToHTMLAcceptColumn(Field: TField; var Accept: Boolean); var fn: string; begin fn := Field.FieldName; Accept := (fn='COD_PROD_SPALLA') or (fn='COD_PROD_EXT') or (fn='NOME') or (fn='UNIDADE') or (fn='QUANTIDADE') or (fn='QUANTIDADE_DEV') or (fn='DES_GRUPO') or (fn='DES_SUBGRUPO'); end; procedure TUniFrameInv.ToHTMLAcceptRow(Dataset: TDataSet; var Accept: Boolean); begin Accept := true; end; procedure TUniFrameInv.ToHTMLGetColumnWidth(Field: TField; var ColumnWidth: Integer; var ColumnTitle: string); begin if Field.FieldName='COD_PROD_SPALLA' then begin ColumnWidth := 50; ColumnTitle := 'Cód. Spalla'; end else if Field.FieldName='COD_PROD_EXT' then begin ColumnWidth := 50; ColumnTitle := 'Cód. na Loja'; end else if Field.FieldName='NOME' then begin ColumnWidth := 350; ColumnTitle := 'Nome'; end else if Field.FieldName='UNIDADE' then begin ColumnWidth := 10; ColumnTitle := 'Unid.'; end else if Field.FieldName='QUANTIDADE' then begin ColumnWidth := 150; ColumnTitle := 'Estoque'; end else if Field.FieldName='QUANTIDADE_DEV' then begin ColumnWidth := 150; ColumnTitle := 'Devolução'; end else if (Field.FieldName='DES_GRUPO') then begin ColumnWidth := 60; ColumnTitle := 'Grupo'; end else if (Field.FieldName='DES_SUBGRUPO') then begin ColumnWidth := 80; ColumnTitle := 'Subgrupo'; end; end; procedure TUniFrameInv.ToHTMLGetFieldValue(Field: TField; var FieldValue: string); begin if (Field.FieldName='QUANTIDADE') or (Field.FieldName='QUANTIDADE_DEV') then FieldValue := FormatFloat('0.##',Field.AsFloat) else if (Field.FieldName='DES_GRUPO') or (Field.FieldName='DES_SUBGRUPO') then FieldValue := copy(Field.AsString,1,13) else if (Field.FieldName='NOME') then FieldValue := copy(Field.AsString,1,100); end; procedure TUniFrameInv.ToHTMLSummaryRow(Field: TField); begin if Field.FieldName = 'COD_PROD_SPALLA' then Inc(Count); end; procedure TUniFrameInv.ToHTMLSummaryStart; begin Count := 0; end; procedure TUniFrameInv.ToHTMLSummaryText(Field: TField; var SummaryText: string); begin if Field.FieldName = 'COD_PROD_SPALLA' then SummaryText := IntToStr( Count ); end; To open in HTMLFrame (Form ShowLink attached): procedure TUniFrameInv.OpenHTML(fname: string); var url: string; begin url := 'http://' + UniSession.Host + '/impressao/' + ExtractFileName( fname ); UniFormShowLink.UniURL1.HTML.Assign(ToHTML.HTML); UniFormShowLink.ShowModal; end; In the print button ExtEvents of Form ShowLink: function OnClick(sender, e) { var frm = UniFormShowLink.UniURL1.iframe; if (frm) { //zPrint(frm.contentWindow); printIframe(frm); } } DatasetToHTML.zip UnitShowLink.zip1 point