Search the Community
Showing results for 'Self Signed certificate'.
-

display the time in UniLabel (client side)
eduardosuruagy replied to gerardocrisci's topic in General
Would the code look like this? JSCODE := Self.Name + '.seconds = 60; ' + '' + Self.Name+'.timer = Ext.TaskManager.start({ ' + ' run: function() { ' + ' var date = new Date(null); ' + ' date.setSeconds(--' + Self.Name + '.seconds); ' + ' var timeString = date.toISOString().substr(11, 8); ' + ' if (timeString == ''0'') { '+ ' Ext.TaskManager.stop(' + Self.Name + '.timer); '+ ' ajaxRequest(''stopTime''); '+ ' }; '+ ' '+ ' '+Self.Name+'.UniLabelTimer.setHtml(''<i class="far fa-clock"></i> Tempo: '' + timeString); ' + ' }, ' + ' interval: 1000 ' + '});'; UniSession.JSCode(JSCODE); -
display the time in UniLabel (client side)
eduardosuruagy replied to gerardocrisci's topic in General
'' + Self.Name+'.timer = Ext.TaskManager.start({ ' + ' run: function() { ' + ' var date = new Date(null); ' + ' date.setSeconds(--' + Self.Name + '.seconds); ' + ' var timeString = date.toISOString().substr(11, 8); ' + ' '+ ' '+Self.Name+'.UniLabelTimer.setHtml(''<i class="far fa-clock"></i> Tempo: '' + timeString); ' + ' '+ ' if (timeString == "00:00:00") { '+ ' ajaxRequest("stopTime"); '+ ' Ext.TaskManager.stop(' + Self.Name + '.timer); '+ ' }; '+ ' '+ ' }, ' + ' interval: 1000 ' + '});'; This way the timer stops, but I don't receive the stopTime event -
display the time in UniLabel (client side)
eduardosuruagy replied to gerardocrisci's topic in General
JSCODE := Self.Name + '.seconds = 60; ' + '' + Self.Name+'.timer = Ext.TaskManager.start({ ' + ' run: function() { ' + ' var date = new Date(null); ' + ' date.setSeconds(--' + Self.Name + '.seconds); ' + ' var timeString = date.toISOString().substr(11, 8); ' + ' '+Self.Name+'.UniLabelTimer.setHtml(''<i class="far fa-clock"></i> Tempo: '' + timeString); ' + ' }, ' + ' interval: 1000 ' + '});'; -
Hi everyone, I'm currently working on a UniGUI project where I need to make an AJAX call from JavaScript code within a TUniHTMLFrame component. I've been trying to set up the AJAX call using ajaxRequest, but I'm encountering difficulties in properly referencing the component to trigger the event handler on the server side. Here is some code, which works fine in a standalone project - but I am not able to transfer this to my component code: procedure TMainForm.UniFormCreate(Sender: TObject); begin UniHTMLFrame1.HTML.Text := '<!DOCTYPE html>' + '<html>' + '<head>' + '<title>Button Test</title>' + '<script type="text/javascript">' + 'function buttonClicked() {' + ' ajaxRequest(MainForm.UniHTMLFrame1, "buttonClick", ["info=Ajax works fine!"]);' + '}' + '</script>' + '</head>' + '<body>' + '<button onclick="buttonClicked()">Click Me!</button>' + '</body>' + '</html>'; end; procedure TMainForm.UniHTMLFrame1AjaxEvent(Sender: TComponent; EventName: string; Params: TUniStrings); begin if EventName = 'buttonClick' then begin ShowMessage('Button was clicked with info: ' + Params.Values['info']); end; end; Despite my efforts, I haven't been able to get the AJAX call to work as expected. I've explored various approaches, including using window.parent, window.parent.Ext.getCmp, and direct references to the component's JSName, but none of them seem to be yielding the desired results. Could someone please provide guidance on how to correctly set up the AJAX call within a TUniHTMLFrame component? Any insights or alternative approaches would be greatly appreciated. Thanks in advance for your help!
-
Well, inside the run function: if (condition that seconds is equal to or less than zero...) { Ext.TaskManager.stop(' + Self.Name + '.timer); //I think you should also stop the timer ajaxRequest(...); //There may be other codes as well }
-
Hello everyone, I use a self-signed certificate for the development environment created through openssl following unigui's own post (here). However, when running the application, any browser considers it insecure and in my case it makes the application slow. For now I disable ssl as it is only in the laboratory. Is there any way around this?

-
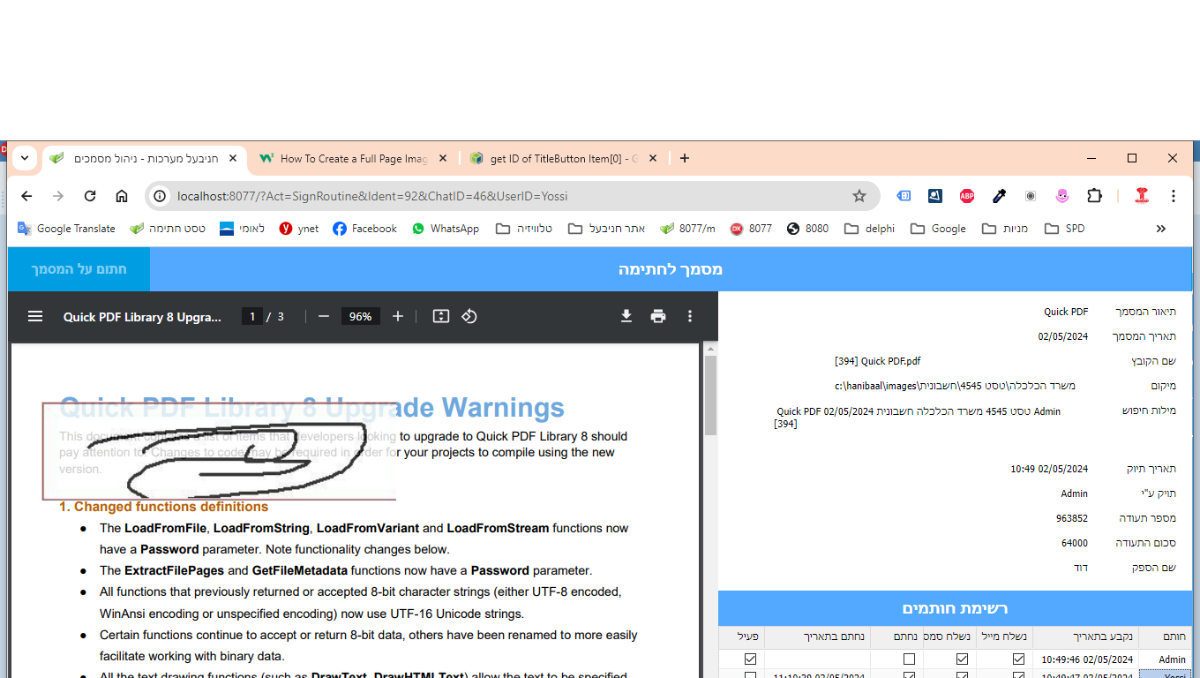
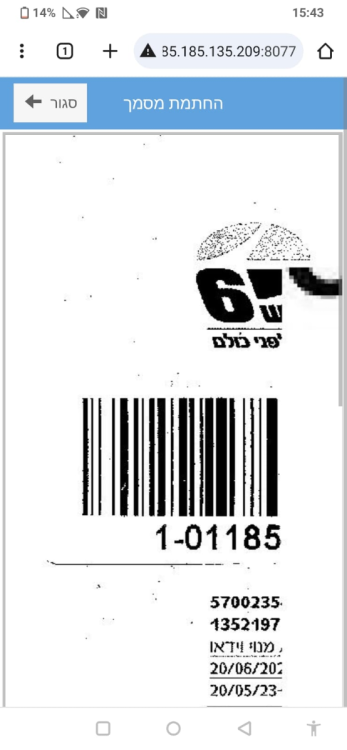
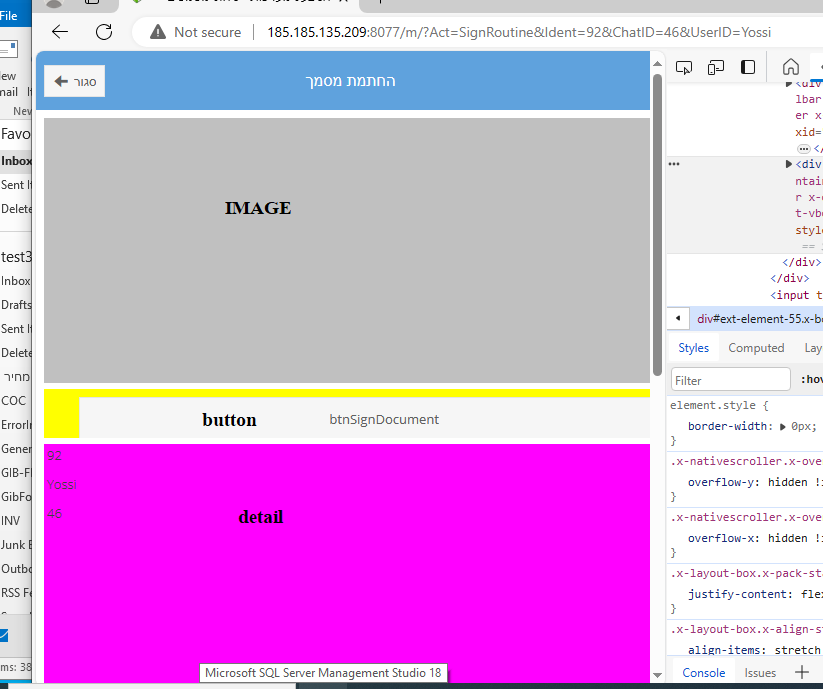
ok. i'm trying to write Document Sign Routine. a document is enter to the DMS (Document Managment System) app. the user adds the Invoice no, sum, and the group of signers. the members of the groups get Mail or SMS or both scheduler until thay sign or unsign. the member get message like this http://185.185.135.209:8077/?Act=SignRoutine&Ident=26&ChatID=4&UserID=admin if you open in chrome (PC) all ok. but in Mobile, the picture get all the screen, I can not open or size with the finger, I dont see the lower panels... i want to see - by the plain end the screen first I work with frame. and when I show the frame and want to change the text of the TitleButtonfrom "Close" to "Back" on after show or ready it did not work in self.TitleButton.items[0].caption = 'Back". only if I use AddJs + finction+ AddJs (run the function). i can not use the global My_Js_Func.js. i am trying to display the 3 containers as vbox automatically by they dont work as "align=alTop". so I set the layout as flot and set the top-left-height programmatically (width=100%) and the container_1 . height := 800; (after I prepare the screen - and load the image) this don't work so - set it with UniSession.AddJS(PdfContainer.JSName + '.setHeight(''' + IntToStr(NewHeight) + ''');'); NewTop := 3; UniSession.AddJS(PdfContainer.JSName + '.setTop(''' + IntToStr(NewTop) + ''');'); but - as I say - in the develop PC it's work fine. in the external server it dont.... i also want to set the size of the ScrollRange to be total of all containers and margin. and I dont no how to set it. the : self.ScrollRange := TotalHighet; is not working. its look like the render has done and it not repaint itself.

-
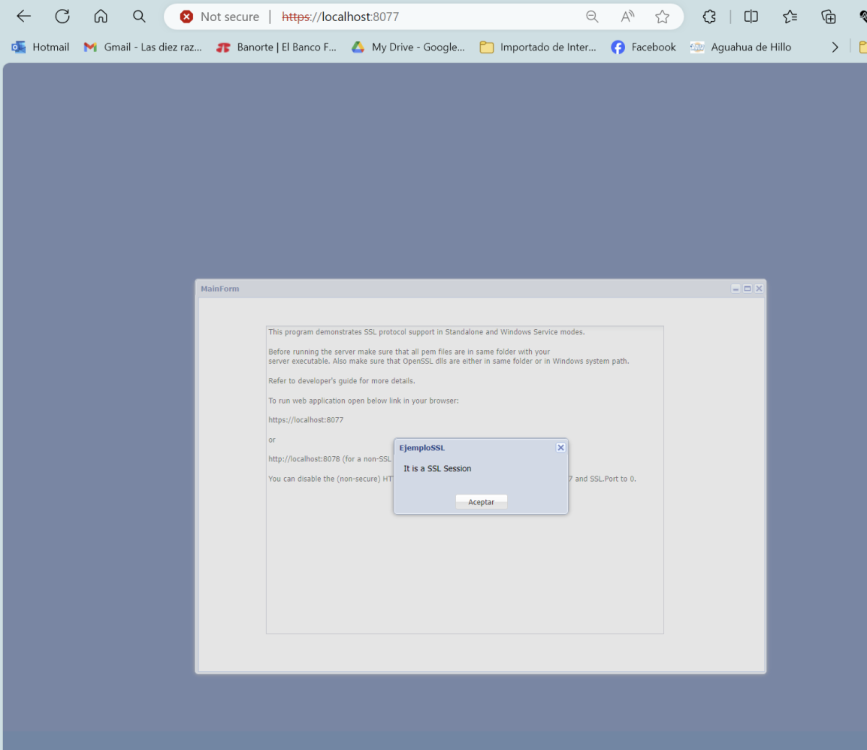
Hello, I have some applications developed with uniGUI but without https type security, so I took on the task of purchasing a certificate for my domain. I have used the uniGUI SSL Demo example and replaced the 3 files with those of my certificate. The program runs without problems, and even shows me the message "It is an SSL Session" but it DOES NOT remove the legend in the browser that it is an NOT secure site. This happens to me both in local mode and in production (on my web server on my domain). Is it necessary to install the certificate on my domain's web server? (according to uniGUI it is not necessary, but I don't know what else to do). Thanks for your help. Felipe Lugo
-

Problem with SSL Certificate implementation
Felipe Lugo replied to Felipe Lugo's topic in Deployment
Thanks Sherzod for your response. The behavior in SSL Demo using the demo certificates is the same (self-signed certificate) as when using Certificates purchased from a Certificate Authority. The installation of the certificates on my web server with its own domain, is it the IIS and/or Apache server? Thanks in advance, -
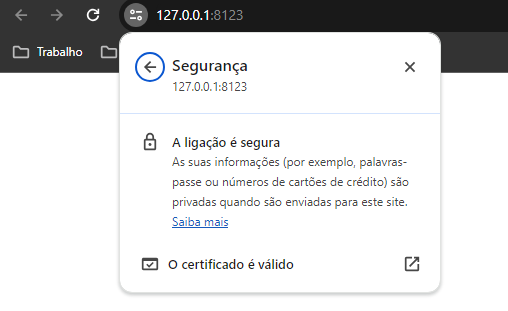
Hello @Abaksoft, your tip was of great help, however, in my case I don't need other devices to access the "server", just the computer itself that is compiling. So, I made a summary of the manual. 1 - Create the san.cnf file in the OpenSSL bin folder (C:\Program Files\OpenSSL-Win64\bin). The content of the file looks like this: [req] default_bits = 2048 distinguished_name = req_distinguished_name req_extensions = req_ext x509_extensions = v3_req prompt = no [req_distinguished_name] countryName = XX stateOrProvinceName = XX localityName = XXXX organizationName = XXXX commonName = 127.0.0.1: Self-signed certificate [req_ext] subjectAltName = @alt_names [v3_req] subjectAltName = @alt_names [alt_names] IP.1 =127.0.0.1 Replace the "X" with your parameters 2 - Open cmd as admin 2.1 - cd C:\Program Files\OpenSSL-Win64\bin 3 - Run command openssl genrsa -out root.key 2048 openssl req -x509 -days 3650 -new -nodes -key root.key -out root.pem -config san.cnf openssl req -x509 -nodes -days 3650 -newkey rsa:2048 -keyout key.pem -out cert.pem -config san.cnf 4 - You created the three files (root.pem, cert.pem, Key.pem) inside the bin folder. Copy these three files to the root directory where the .exe of your unigui project is located. 5 - Finally, open the Windows certificate manager (certmgr.msc), navigate to the "trusted root certificate authorities" folder and import the cert.pem file Close browser e run project.
-
Hello, Yes, because a self-signed certificate is used. Yes...
-
I have several settings that I save in my database such as font sizes, colors, etc. How could I give an update on "CustomCSS" because I realize that it is only loaded when creating the "TUniServerModule" Unit ServerModule; public { Public declarations } Procedure UpdateCSS; End; Procedure TUniServerModule.UpdateCSS; Begin With Self.customCSS Do Begin Add('.x-myfield-focus { '); Add(' border-color: #7eadd9; '); Add(' background-color: #FFFFE1; '); Add(' color: #FF0000; '); Add(' background-image: none; '); Add(' } '); End; End; //============================================================================================================ Unit Main; procedure TMainForm.UniFormCreate(Sender: TObject); begin UniServerModule.UpdateCSS; UniEdit2.JSInterface.JSConfig('focusCls', ['myfield-focus']); UniComboBox1.JSInterface.JSConfig('focusCls', ['myfield-focus']); end;
-
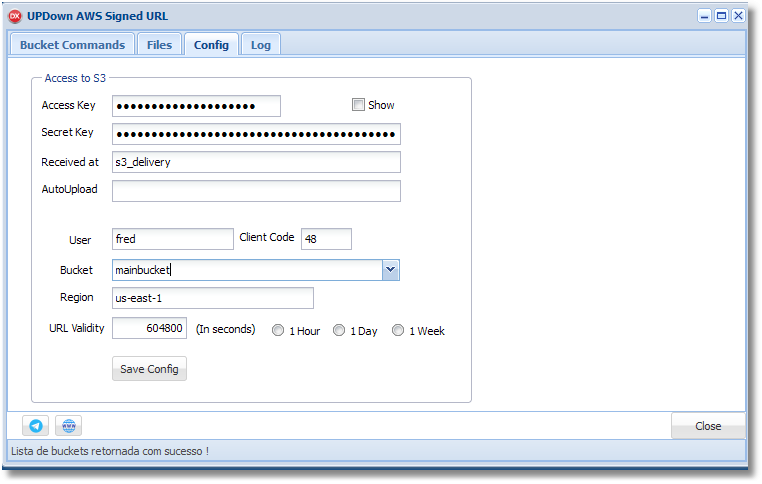
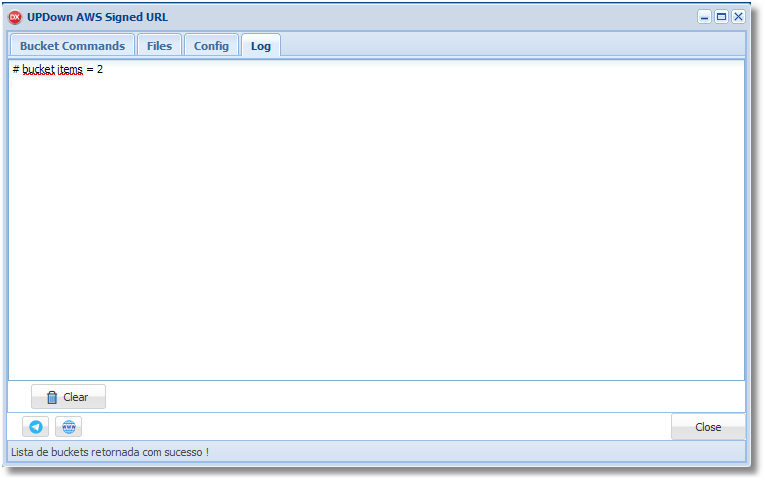
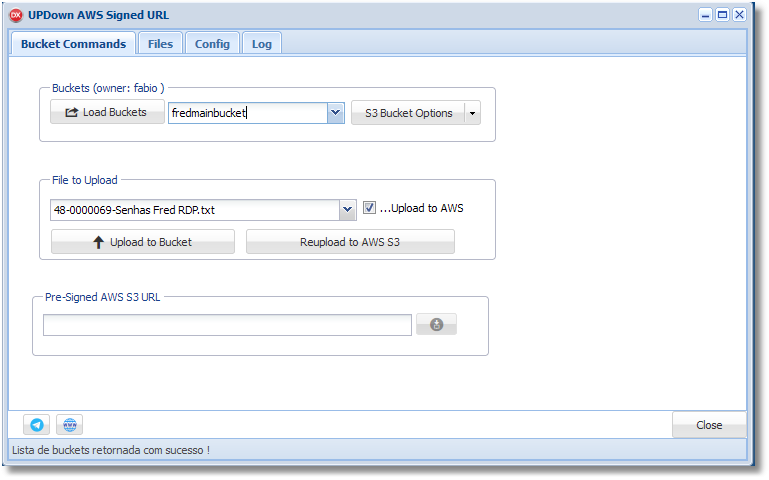
 Amazon (AWS) S3 File / Bucket Manager and Pre-Signed URL generator Amazon Simple Storage Service (Amazon S3) is a scalable, high-speed, web-based cloud storage service. The service is designed for online backup and archiving of data and applications on Amazon Web Services (AWS). Don't know s%#* about S3 ? See here: https://www.techtarget.com/searchaws/definition/AWS-bucket Features list and specs: - Create, Delete and Retrieve Bucket List. - uniGUI Server is just perfect to this kind of application. You can also turn into a service and work like a bridge between your end users and your storage service at AWS. - Upload files to buckets, download files directly, download link etc... - All operations can be done in one single step. - A client (your end-user) could upload files using this uniGUI server (this very program) and, from there, this (same) uniGUI APP upload to Amazon S3 on the fly and could generate a pre-signed download url for sharing. - Retrieve bucket's content list at start-up. - Delete items (files) at bucket. - Generates pre-signed download link. - Configures pre-signed validation period limits for download URLs links (ideal for security on files publishing in a enterprise environment) per file . - Save configs and preferences. - This project is ideal for distributing and manager files and logical buckets using Amazon S3 service (AWS3). - Good for sharing docs, files, contracts, resources with security, download link with expiration time etc. - You need a Amazon Account with S3 enabled. - Get your AccessKey and SecretKey in AWS Console/Dashboard, configure your storage service, use the config tab and you are good to go. - Also, coming soon Mega.nz S3 Service. https://mega.io/pt-br/objectstorage Get in touch for more info at WA/TG 55 11-98620-7676.
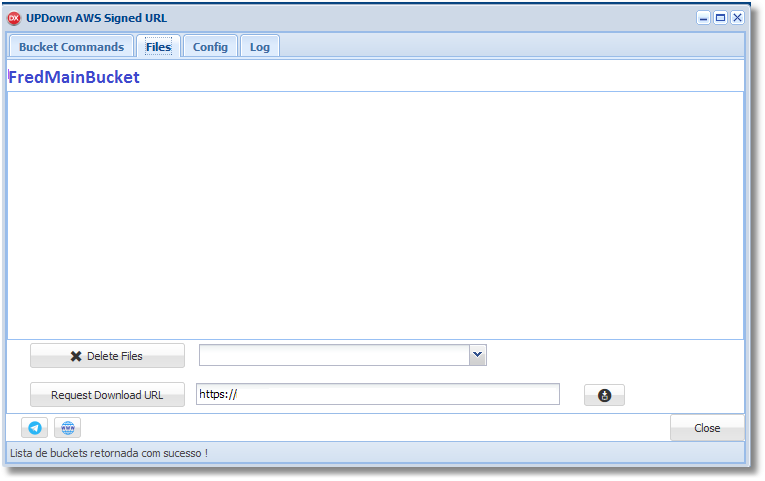
-
Dears, You can download it here : http://forums.unigui.com/index.php?/topic/18951-help-with-ssl-intranet/&do=findComment&comment=136067
-
Good morning gentlemen, I need to print self-adhesive labels from a zebra pda. A Zebra printer is connected to the PDA via Bluetooth. The program is made in Unigui for mobile The program is located on a Windows Server 2012 server. Several zebra terminals are connected to this server via intranet and/or extranet(simcard). El reporte se genera usando fastreport. What is the mechanism that I need to use to print? If I use the program made with unigui movile from the desktop on a desktop printer it works, but if I use the same program from the mobile you can view the label but it is not printed, the idea is to print from the handheld directly (or manually). Is there a technical or commercial solution? Thank you for your input
-
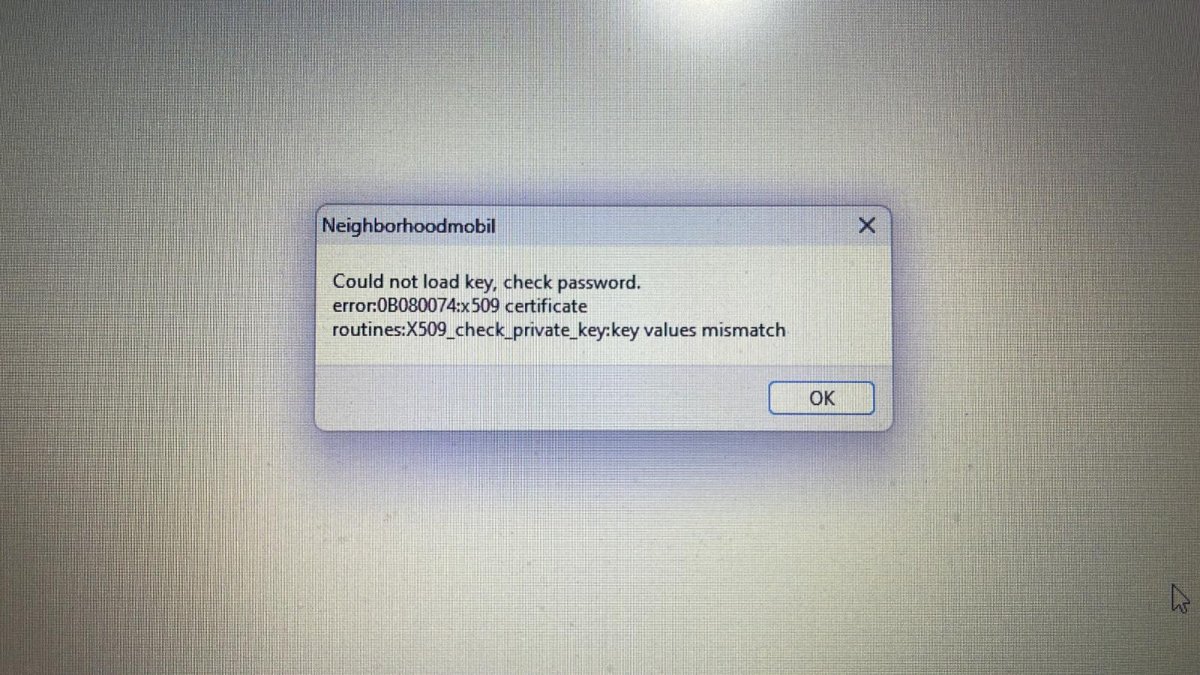
 Hi group This is the issue: SSL Certificate from SSLS.com I get those files: myPage_com.crt -> renamed to certificate.crt myPage_com.ca-bundle -> renamed to ca_bundle.crt myPage_com.p7b www.myPage.com.crs private.key -> renamed to key.pem I perform this steps: openssl x509 -in certificate.crt -out cert.pem -outform PEM openssl x509 -in ca_bundle.crt -out root.pem -outform PEM My Unigui App running in 32 bits. Copied the files key.pem, cert.pem and root.pem in the main root app: and the x86 folder files: libeay32.dll and ssleay32.dll Server module configuration: SSL->Enabled = True SSL->SSLOptions->CertFile = cert.pem SSL->SSLOptions->KeyFile = key.pem SSL->SSLOptions->RootCertFile = root.pem Method: sslvTLSv1_2 Mode: sslmUnassigned SSLVersion: sslvTLSV1_2 The staff of ssls.com told me the private key HAS NOT password, it is clean. Does anybody can help me please..? Thanks group.
-
 Yes, this is possible solution and is good practice. If the file is signed then it is not malicious! - but not always true. Digitally signed files know who the owner of the certificate is, but is there also certificate theft, even if signed it does not make the file safe. "Here in Brazil we have e-card (hard solution) to validate biz and digital signatures in docs (gov, secure transactions, banks etc) much alike a "smart" debit card" - Our government too, but that's because they want to know who owns the file and for security reasons (i think). In theory, we apply the principle: the user is malicious and we look for as many rules as possible to make it difficult for him to attack the server. Because the most dangerous thing in an attack with an infected file is the infection of the server. When a server is infected, the consequences are not just for the server owner, but also for the users. I recently read an article about an mobile phone company vulnerability that went undetected for some years. This has certainly given malicious individuals the opportunity for more attacks or data theft. Ultimately, the goal is to keep the server from getting infected. to your questions: 1- You allow the user to upload to your server with authentication provided by you - Yes, only authorized user can upload files, even I add user details in the upload process, which is verified by the server 2- You use https - Yes, not self signed 3- You can save in a non public folder with no access to browser - Yes, outer directory, protected with user rights of OS. 4- You can modify rights to such file - not yet, but in the future I will (I work on it) 5- You can save in raw format with out decoding or absolutely removing association to a app. - Yes, I save a file with a changed name and no extension. The raw format is a good idea, thanks 6- Only who upload can download it - No, only authorized user to app can download or open files. Like example : 1. I give rights to clients to upload advertisement files and this ad will be played on other users (such as video or image with iFrame) 2. I give rights to clients to upload their own image/video/other files (like YouTube) and it will play on other users 3. I grant rights to an internal user of the company to upload video files from security cameras, then only camera owners can download recordings from each day all this can be do it from mobile device (problem with smart cards) or pc 7- All upload to your server you have antivirus and such - Yes, I have an antivirus app and an anti-malware app. But getting information that files are dangerous is not enough if no one is watching (like at 03:00 in the morning) and files are on server. Consider this: a- If not sharing to third parties... issue is ? - 1. server is at risk, all work can stop. 2. I share it, so the risk is to malicious files go to clients PC and make them bot net. b- if now allowing downloads and any kind of access... issue is ? - risky files may attack clients, a Trojan horse or worm c- Any options the burden of processing and things going wrong is at the client-side (delays, corruptions etc etc). - I prefer it to be done on the server side, and on the client side only hash files and HMAC for them. On the server side, when they upload files, they first go to the temporary directory (with changed names), but they are not encrypted, and this creates a risk for the server, so I'm looking for a way to secure (obfuscate/encrypt) files beforehand.
 -
ServerModule {* MAPS *} Self.CustomFiles.Clear; Self.CustomFiles.Add('https://maps.googleapis.com/maps/api/js?key=' + Self.KeyMaps + '&callback=gmNoop&libraries=geometry,places,visualization'); Self.CustomFiles.Add('../files/maps/uniGmap.css'); Self.CustomFiles.Add('../files/maps/markerwithlabel_packed.js'); Self.CustomFiles.Add('../files/maps/markerclusterer.js'); console: Google Maps JavaScript API has been loaded directly without loading=async. This can result in suboptimal performance. For best-practice loading patterns please see https://goo.gle/js-api-loading Has anyone resolved this?
-
Hi guys, There has been a lot of conflicting information on the forum about whether uniGui can create PWA apps and how to go about turning your app into a PWA. I have done quite a bit of work with PWA’s and I am hoping that this post will clarify the issue and provide easy-to-follow guidelines for those who are interested. To make the process easier I have selected a simple demo app that comes with uniGui and uploaded it for you after converting it to PWA. You can use the url below to see the resulting PWA on any device. https://www.qssldtf.com:8086 The answer to whether uniGui is PWA capable depends very much on what aspect of PWA you are looking for. Clearly there is no doubt that any uniGui app can be made installable on all devices that support PWA technology. This includes all mobile devices as well as desktops running Chrome or MS Edge. Firefox & Opera support aspects of PWA but do not allow installation. And simply making your app installable makes such a massive a difference to ease of use (no browser, faster launch, full-screen, smooth navigation etc.) that there should be no excuse why you would not want to do it. How easily this can be done depends on the deployment option you have chosen. More to this below. The other aspects of PWA (offline operation, push notification & access to device resources) are, in my opinion, only achievable with uniGui if you build your UI with HTML and JavaScript because otherwise Ext JS puts too many stumbling blocks in the way. There are 3 basic requirements to making your app a PWA: The site must be accessed via HTTPS with a valid SSL certificate. The site must have a valid web Manifest You must supply and register a Service Worker HTTPS requirements PWA sites will only work over a secure connection with a valid SSL. However, for development purposes Google Chrome allows you to bypass this requirement when working over localhost so you can easily debug and install the PWA on your development device. This feature is not a default setting in Chrome. You need to enable it via chrome://flags as explained here Options for testing service workers via HTTP. Web Manifest The web manifest is a text file that contains a single JSON object whose fields map out the essential settings of your PWA site. By convention the manifest usually has the filename manifest.json or manifest.webmanifest and must reside in the root folder of your app. It contains all the information needed to tell the browser how the PWA will look when it is installed on the target device and configures how it will behave when it is launched. The manifest must also point to a list of icons of varying sizes to be used on splash-screens of devices you are targeting. There is a wealth of information about the web manifest online so I won’t say anymore here, except to mention that this is where there is a stumbling block with uniGui, unless you are deploying via ISAPI. As many developers have discovered, it is impossible to import the manifest if your app is running in standalone mode, with or without hyper-server. You will consistently get the dreaded “401 (unauthorised)” error. However I managed to come up with a means to sneak the manifest in through the back-door and I will share that below. Service Worker The Service Worker is a piece of JavaScript code that runs in its own thread in the browser background and intercepts and routes all the communication between the client side of your app and both the server and the rest of the world. You have tools to interrogate and manipulate this communication at will with JavaScript. You can immediately see how things like “working offline” and “push notifications” evolve from this. Every PWA running in the browser must register its own service worker. By convention the service worker has a filename like sw.js and usually reside in the root folder of your app. Depending on the desired functionality the service worker can be very complex or a simple stub that just relays messages without any interrogation. The service worker included in the demo project I have uploaded with this post is of the latter type and you can safely use it in all your apps. However, every service worker must have a unique “cache-name” so you need to edit the file and change the embedded cache-name to something that matches your app-name. What is with Safari At the point of this writing Safari does not yet support the web manifest. When you run you PWA on any Safari device the manifest is completely ignored. Instead, in order to get a PWA to work Safari requires that you insert some essential meta tags into the header of your html. It so happens that this anomaly with Safari makes it much easier to convert a uniGui app installable on Apple devices. Just give the app the little stub of service worker discussed above and add a tiny bit of JavaScript into the ServerModule.CustomCSS to activate it then add the following meta tags and into the ServerModule.CustomMeta and you have a working PWA for all Safari Devices. Gone is the “401 (unauthorised)” nightmare. <meta name="apple-mobile-web-app-capable" content="yes"> <meta name="apple-mobile-web-app-status-bar-style" content="black"> <meta name="apple-mobile-web-title" content="Video Demo"> <meta name="apple-touch-icon" href="/files/icons/i144x144.png" sizes="144x144"> <meta name="apple-touch-icon" href="files/icons/i192x192.png" sizes="192x192"/> <meta name="apple-touch-icon" href="files/icons/i152x152.png" sizes="152x152"/> I continue to see recent articles online that tell you that in order to get your PWA to also work on Safari you have to insert these meta tags into your app. This is old news guys. This Safari issue was made redundant in April 2020 when Google introduced PWACompat. This utility will look at your web manifest and automatically adjust the html of your app to satisfy Safari (and other legacy browsers). We’ll see how to use it below. So how do you go about converting you uniGui to PWA The components and bit of code you need are included in the project I have supplied so I suggest you start by downloading and compiling the project to get to grip with how things work. The project is very simple and should compile without any issues. Note that I have configured the project to store the resulting exe and dcu’s in their own folders because I prefer to keep the source folder uncluttered. After compiling, run the app by double-clicking on the resulting exe then use Chrome to access http://localhost:8077. Don’t forget to configure Chrome to bypass HTTPS requirements as stated above beforehand. Once the site has opened I suggest you activate Chrome’s dev-tools (F12 key) and switch to the “application” tab. There you can see that both the service worker and manifest have installed successfully and all the icons will be shown. You should now also see an install button in the toolbar. Depending your version of Chrome, you might have to close and restart the site if you don’t see the install button. Go ahead and run the install, it is very easy to uninstall later. The PWA should install immediately and switch over to a full-screen standalone application and the app icon should appear on your desktop. By the way, the easiest way to uninstall a PWA is to go to chrome://apps. All installed PWA’s will be shown and you can right-click to select the uninstall option. It might interest you to know that the PWA will also be registered as a valid Windows application in the Registry. So you can uninstall it by going to “Control Panel -> Programs & Features”. Lets’ analyse the PWA components in the demo project In the root folder of the executable you can see the following required files: manifest.json sw.js (Service Worker) We also have a list of splash-screen icons stored in the folder files/icons. That is in general all you need from a components point of view. In theory all you then need to do now is to import the manifest and register the service worker when the project starts up. Importing the manifest You do this by inserting this into ServerModule.CustomMeta: <link rel="manifest" href="/manifest.json"> Registering the Service Worker This is done with the bit of JavaScript shown below. You insert this into ServerModule.CustomCSS. As you can see, it is good practice to first check whether the host browser supports service workers before attempting to register. In the script I have supplied with the demo project I have inserted some logging (console.log) to show weather or not registration has succeeded. You can see the results in the “console” page of the dev-tools. You need to comment the log statements out before publishing your PWA app. </style> <script> if ('serviceWorker' in navigator) { navigator.serviceWorker.register('/sw.js') } </script> <style> If you are deploying through ISAPI that is all you need to do. The site will work as a PWA in Android and Chrome. But not Safari. In order for Safari to work you need bring in the PWACompact utility discussed above. You do this by adding the pwacompat link in the ServerModule.CustomMeta entry, before the manifest link. So the CustomMeta entry will look like this (note I included the favicon injection that we all do): <link rel="icon" type="image/png" href="files/icons/i192x192.png" sizes="192x192"/> <meta name="apple-mobile-web-app-capable" content="yes"> <script async src="https://cdn.jsdelivr.net/npm/pwacompat" crossorigin="anonymous"></script> <link rel="SHORTCUT ICON" href="/favicon.ico"> <link rel="manifest" href="/manifest.json"> Briefly, the PWACompat utility will analyse your manifest and insert additional meta links to satisfy Safari. You will them have a PWA that will work in all PWA compatible browsers. But, as things stand, this will only work when deployed through ISAPI. If you are running in standalone mode the “manifest” link will fail with a “401 (unauthorized)” error and PWACompat will fail because it does not have a manifest to work with. To fix this issue I borrowed an idea from here How to Setup Your Web App Manifest Dynamically Using Javascript and adjusted it to overcome some ExtJS quirks. The trick here is to remove href="/manifest.json" from the manifest link in the CustomMeta script and replace it with a placeholder id that we can use later to inject a dynamic manifest. The manifest meta link now looks like this: <link rel="manifest" id="manifest_link"> What I did for standalone deployment is to read the manifest in Delphi and generate some JavaScript that will be injected into the starting html. The resulting JavaScript must be inserted into the “Script” field of the form that activates first. If your application uses a Login form the script should will be inserted the LoginForm is activated, otherwise it has to be inserted into the MainForm. The project demo I have supplied does not have a Login form so the script is inserted as follows in the Main form: procedure TUniLoginForm1.UniLoginFormCreate(Sender: TObject); var sManifest : String; begin sManifest := UniMainModule.GetDynamicManifest; if sManifest > '' then Self.Script.Text := sManifest; end; As the code indicates I have placed the required JavaScript generation code in the MainModule for ease of use. The UniModule.GetDynamicManifest function converts the contents of the manifest.json file into a JavaScript object and add the necessary java code that will modify the manifest link we added via CustomMeta (<link rel="manifest" id="manifest_link">) and insert an “href” that points to the new manifest object. You will notice when you look at the manifest generation function that it first checks the manifest.json to make sure that it contains all the essential fields. I discovered by accident that Delphi’s JSON handling does not have decent exception handling and there is no way of avoiding a crash if you try to reference a field that does not exist. If your manifest.json does not conform you will get an empty JavaScript back and the PWA won’t work. In case you want to see the resulting JavaScript I have added some code in the function to save it in the folder Config off the root folder. You just need to un-comment it. Additionally, it is a habit of mine to use the ini file concept to configure my applications. This is what I have done regarding the CustomMeta and CustomCSS scripts. I store the changes I need in an external text file and import it at start-up. For this project I have stored the data in the folder “Config" within the root folder. This is the code I use to populate the ServerModule: procedure TUniServerModule.UniGUIServerModuleCreate(Sender: TObject); var sData, cfgFolder, cfgFile : String; begin cfgFolder := ServerRoot+'config\'; //Import service worker registration cfgFile := cfgFolder + 'script.cfg'; if FileExists(cfgFile) then with TStringList.Create do try LoadFromFile(cfgFile); sData := Text; if sData > '' then CustomCSS.Text := sData; finally free; end; //Import manifest meta links cfgFile := cfgFolder + 'meta.cfg'; if FileExists(cfgFile) then with TStringList.Create do try LoadFromFile(cfgFile); sData := Text; if sData > '' then CustomMeta.Text := sData; finally free; end; end; To summarise, these are the steps you need to do to convert an existing uniGui app to PWA: Create a web manifest.json and place it in the root folder of your executable. I suggest you initially copy my manifest and change the “name”, “short_name” and start_url to fit your project. For standalone deployment the start_url should point to the project executable if you are not using the hyper-server, otherwise it should point to hyper_server.exe. For ISAPI it should point at the hyper-server dll, whatever you have called it. 2 quick tips here: The “name” in the manifest is used on the splash screen of mobiles and the caption of the MainForm when running on desktops. However what you have entered in the “name” field will be concatenated with whatever you have in the “Title” field of the ServerModule. So remember to blank the ServerModule’s Title field. FYI the “short_name” will be used on the home-screen icon of mobiles and shortcut icon of desktops, but only if the “name” is too long (I think >40 chars). There are numerous online tools to help you create your icons. I use https://manifest-gen.netlify.app. You just need to upload a 512x512 image and it will generate all the icons you require. Copy my sw.js into the executable root folder. Copy the contents of my files/config folder into the files folder of your executable. Copy the CustomMeta & CustomCSS importing code from my project into your ServerModule. If you are using standalone deployment copy the dynamic manifest generation function from my project into your MainModule and insert the scrip-handling calls in your LoginForm or MainForm. Something to be aware of regarding installing you PWA’s on your test device: Chrome uses the URL as a unique identifier for each PWA. So once you have installed an app running on https://localhost:8077 you won’t be able to install another app running on the same port. So you have to either un-install the previous one or use a different port. That’s it guys. I hope this post generates a bit of renewed enthusiasm. PWA-VideoDemo.zip
- 17 replies
-
- 13
-

-

-
- pwa
- web manifest
- (and 1 more)
-
procedure TUniDBGridHelper.ConfigureColumAction(SetEvents : Boolean); var lCoumn: TUniBaseDBGridColumn; begin if Assigned(Self) then begin Self.JSInterface.JSAddListener('actionclick', 'function(itemId){alert(itemId.value); this.showMask("Aguarde processando...")}'); lCoumn := Self.ColumnByName('actions'); if lCoumn <> nil then begin if SetEvents then begin if not Assigned(Self.OnDblClick) then Self.OnDblClick := Self._MyDblClick; if not Assigned(Self.OnKeyDown) then Self.OnKeyDown := Self._MyKeyDown; end; lCoumn.Width := 57; lCoumn.Alignment := taCenter; lCoumn.Title.Caption := 'Ações'; lCoumn.Title.Alignment := taCenter; lCoumn.ActionColumn.Enabled := True; lCoumn.ActionColumn.Buttons.Add; lCoumn.ActionColumn.Buttons[0].ButtonId := 0; lCoumn.ActionColumn.Buttons[0].Hint := 'Editar'; lCoumn.ActionColumn.Buttons[0].ImageIndex := 1; lCoumn.ActionColumn.Buttons.Add; lCoumn.ActionColumn.Buttons[1].ButtonId := 1; lCoumn.ActionColumn.Buttons[1].Hint := 'Excluir'; lCoumn.ActionColumn.Buttons[1].ImageIndex := 16; end else begin lCoumn := Self.ColumnByName('del'); if Assigned(lCoumn) then begin lCoumn.ActionColumn.Enabled := True; with lCoumn.ActionColumn.Buttons[0] do begin Hint := 'Excluir'; ImageIndex := 16; end; end; lCoumn := Self.ColumnByName('edit'); if Assigned(lCoumn) then begin lCoumn.ActionColumn.Enabled := True; with lCoumn.ActionColumn.Buttons[0] do begin Hint := 'Editar'; ImageIndex := 1; end; end; end; end; end; I just need the mask to fire only with ButtonId = 0 or ButtonId = 1
-
Hi, is it possible to add more app security options when uploading files, such as: 1. Generating a hash for the file and sending it to the server before uploading. Checks if the uploaded file has been modified during the transfer 2. Checking file formats and extensions " Make sure you check the file extension of uploaded files against a white-list of permitted file types. Do this on the server-side, since client-side checks can be circumvented." 3. Checking the Content-Type Header " Files uploaded from a browser will be accompanied by a Content-Type header. Make sure the supplied type belongs to a white-listed list of permitted file types. (Be aware that simple scripts or proxies can spoof the file type, though, so this protection, while useful, is not enough to dissuade a sophisticated attacker.)" 4. Limiting min file size "To protect the stability of your service, you want to keep control over who and when can upload files to your website. Two-step verification can be useful here, as well as limiting the size of the file: both very large and very small files can be used for a DoS attack, so don’t forget to establish a minimum file size limit as well." 5. File encryption Blocks direct execution of the file on the server side 6. Sanitize Filenames "Overlong filenames could be abused to exploit buffer overflow vulnerabilities. Similarly, files with special characters in the name can cause weird behaviour, depending on how they are treated by your software. It is good practice to ensure file names are sanitized before being written to disk." 7. Using signed URLs to simplify data uploads "The signature allows a specific action to be executed on cloud-resource URL for a specific timeframe. For example, a resource can be uploaded by performing a one-time POST to a signed URL with a signature that enables this POST for 30 seconds. The action is further bounded by the permissions of the credentials used to sign the URL. For example, a URL signed by read-only credentials cannot be used to upload data." There are many ways to attack the server when uploading files. SSL between client and server does not provide 100% attack protection and security engineers ask us to add additional protections when uploading a file to better protect the server.
-
Hi Abaksoft, Thanx for your PERFECT work .. i tried a lot! of things and found a solution for the Android Problem 😉 The maion problem is the "-extensions v3_req" 1. change in delphi: //A.2.2 root.pem stDays:=intToStr(365 * upYrears.Position); param:='req -x509 -days ' + stDays + ' -new -nodes -key root.key -out root.pem -config san.cnf -extensions v3_req'; ShellExecute(Application.Handle ,PChar('RunAs'),PChar(Fichier),PChar(param),PChar(Dossier),SW_HIDE); sleep(300); //A.2.3 cert.pem param:='req -x509 -nodes -days ' + stDays + ' -newkey rsa:2048 -keyout key.pem -out cert.pem -config san.cnf -extensions v3_req'; ShellExecute(Application.Handle ,PChar('RunAs'),PChar(Fichier),PChar(param),PChar(Dossier),SW_HIDE); sleep(300); 2. change in san.cnf [req] default_bits = 2048 distinguished_name = req_distinguished_name req_extensions = v3_req x509_extensions = v3_req prompt = no [req_distinguished_name] countryName = XX stateOrProvinceName = N/A localityName = N/A organizationName = Self-signed certificate commonName = Self-signed certificate [req_ext] subjectAltName = @alt_names [v3_req] subjectAltName = @alt_names basicConstraints = critical,CA:true [alt_names] IP.1 =10.0.0.10 3. Export CA in Windows - and import it as CA in Android .. Works 🙂
-
Good afternoon, I am capturing a person's signature using unigui for mobile, once the signature is captured I additionally require the date and time of the signature when the person signed, to record it in the database. The signature and time must be created as a single image to be recorded in the database or exported as a png/jpg Could someone give me the code required to do so? . Thank you for your cooperation
-

Creating a Self Signed Certificate in 3 Secondes...
Abaksoft replied to Abaksoft's topic in Sample Projects
No, it does'nt work. Self signed certificats are for testing purpose or for local network. If you want to use your domain name from web as secure https://xxxx.domain.com.br the task is hard : you have to export your certificat from your server and communicate it to all your known clients to install it on there PC / Device ! Mmm...Asking ChatGp4 "is it possible to get a free trusted certificate for a public websites ?" Answer: "Yes, it is possible to obtain a free trusted certificate for a public website. There are several certificate authorities (CAs) that offer free SSL/TLS certificates that are trusted by major browsers. Here are a few popular options: Let's Encrypt: Let's Encrypt is a non-profit CA that provides free SSL/TLS certificates. They offer an automated certificate issuance and renewal process, making it easy to obtain and manage certificates for your website. Cloudflare: Cloudflare offers a free SSL/TLS service called "Universal SSL." When you sign up for their service, they provide you with a free SSL certificate that is automatically installed on your website. Cloudflare acts as a reverse proxy, encrypting the traffic between the client and Cloudflare's servers. ZeroSSL: ZeroSSL offers free SSL certificates that are valid for 90 days. They provide both automated and manual certificate generation options. ZeroSSL also offers an ACME client that can be integrated into your server for automated certificate issuance and renewal. SSL.com: SSL.com provides a free SSL certificate option called "SSL.com FREE." Their free certificate is valid for 90 days and supports both domain validation and wildcard certificates. It's worth noting that while these free certificates are trusted by browsers, they may have some limitations compared to paid certificates. For example, they may have a shorter validity period, limited support, or fewer additional features. If your website has specific requirements or needs extended validation, you may need to consider a paid certificate from a trusted CA. Additionally, some hosting providers or content delivery networks (CDNs) also offer integrated SSL/TLS solutions with free certificates. It's worth checking if your hosting provider has any options available for obtaining trusted certificates at no additional cost." -
Basit ama etkili bir yazdırma sunucusu. Mantık olarak unigui üzerinden lokal ip yi kontrol ettiriyorum daha sonra yazıcı ismini alıyorum daha sonra rest sunucusuna fastreportdan aldığım pdf verisine gönderiyorum. unit PrinterServerMethodsUnit; interface uses System.SysUtils, System.Classes, Datasnap.DSServer, Datasnap.DSAuth, Printers, IdBaseComponent, IdComponent, IdIPWatch, WinSpool, ShellAPI, gtPDFDoc, gtPDFPrinter, Types; type {$METHODINFO ON} PrinterServerMethods = class(TComponent) private { Private declarations } function GetLocalIp: string; public { Public declarations } function Connect(ip: string): Boolean; function GetPrinterName: string; function Print(data: TStream): Boolean; end; {$METHODINFO OFF} implementation uses System.StrUtils; function PrinterServerMethods.Connect(ip: string): Boolean; begin if ip = GetLocalIp then Result := True else Result := False; end; function PrinterServerMethods.GetLocalIp: string; var IPW: TIdIPWatch; begin IPW := TIdIPWatch.Create(nil); try if IPW.LocalIP <> '' then Result := IPW.LocalIP; finally IPW.Free; end; end; function PrinterServerMethods.GetPrinterName: string; begin if (Printer.Printers.Count > 0) then begin Printer.PrinterIndex := -1; Result := Printer.Printers[Printer.PrinterIndex]; end else begin Result := ''; end; end; function PrinterServerMethods.Print(data: TStream): Boolean; var pdf: TgtPDFDocument; pdf_printer: TgtPDFPrinter; begin try try pdf := TgtPDFDocument.Create(Self); pdf_printer := TgtPDFPrinter.Create(Self); pdf.LoadFromStream(data); pdf_printer.PDFDocument := pdf; pdf_printer.SelectPrinterByName(GetPrinterName); pdf_printer.ShowSetupDialog := False; pdf_printer.PrintDoc; Result := True; finally pdf.Free; pdf_printer.Free; end; except on e: exception do begin Result := False; end; end; end; end.