MVakili
-
Posts
161 -
Joined
-
Last visited
-
Days Won
9
Content Type
Profiles
Forums
Events
Everything posted by MVakili
-
please share you solution
-
And as an explanation, I have to say, we used the virtual table as a powerful and highly flexible memory table in the software. I will put an example of the used functions for your review. 1- These sub-programs are used to save and retrieve virtual tables in SQL Server tables, so you can define any field of the table as a NVarChar(max) and store a virtual table in it. //--------- Wide string to TStringStream procedure TDMT.WS2Mem(S: string; Var K : TMemoryStream); var StringStream: TStringStream; begin StringStream:=TStringStream.Create(S); K:=TMemoryStream.Create; K.Position := 0; K.CopyFrom(StringStream,StringStream.Size); end; //--------- TStringStream to WideString function TDMT.Mem2WS(MemoryStream : TMemoryStream): string; var StringStream: TStringStream; begin Result:=''; StringStream:= TStringStream.Create(''); try MemoryStream.Position := 0; StringStream.CopyFrom(MemoryStream, MemoryStream.Size); Result:= StringStream.DataString; Result := Result; finally FreeAndNil(StringStream); end; end; 2- Example of using VarTable:=TVirtualTable.Create(Self); with VarTable Do Begin Close; if DMT.Mem2WS(InVarStr)<>'' then LoadFromStream(InVarStr); Else Begin AddField('Fname',ftString,20); AddField('FVal',ftWideString,20); End; Var VarStr : TMemoryStream; begin VarStr:=TMemoryStream.Create; DMT.WS2Mem(DMT.QAskAnswers.FieldByName('SavedValues').AsString,VarStr ); Try MemParams.Close; MS:=TMemoryStream.Create; WS2Mem(DMT.QAskAnswers.FieldByName('RepParameters').AsString,MS); if Mem2WS(MS) <> '' then MemParams.LoadFromStream(MS); Finally FreeAndNil(MS); MemParams.open; End;
-
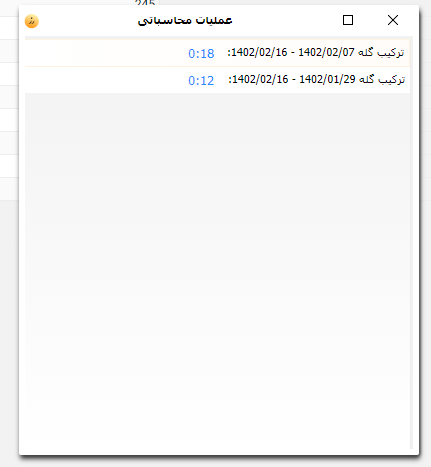
Sometimes, we want to run a store procedure in the server, which takes a lot of time, and in this case, the page even gets disconnected. To solve this problem, it is enough to create a Thread in the program and only monitor its execution Here I present the solution I created for myself and I will be happy if you help to improve it 1- create a temp table for list of process DMt.ProccessTable:='_X_'+DMt.CurrentPreName; DMt.Exec_SQLClient('If Not Object_Id('+QuotedStr(DMt.ProccessTable)+') is Null Drop Table '+DMt.ProccessTable); DMt.Exec_SQLClient(' Create Table '+DMt.ProccessTable+' ([StartDT] datetime DEFAULT (getdate()),[PName] NChar(50) ,[PID] int )'); 2- define type Type TSQLQueryThread = class(TThread) private FID: Integer; FQuery: string; FTempTable : String; FConnection: TMSConnection; protected procedure Execute; override; public constructor Create(const AID: Integer; const AQuery: string; AConnection: TMSConnection;ATempTable:String); property ID: Integer read FID; end; 2- functions for Thread procedure TSQLQueryThread.Execute; var Query: TMSQuery; begin Query := TMSQuery.Create(nil); try Query.Connection := FConnection; Query.SQL.Text := FQuery; Query.Execute; finally Query.Free; end; end; constructor TSQLQueryThread.Create(const AID: Integer; const AQuery: string; AConnection: TMSConnection;ATempTable:String); begin inherited Create(False); FID := AID; FQuery := AQuery; FConnection := AConnection; FTempTable:=ATempTable; end; procedure TDMT.TH_QueryThreadTerminated(Sender: TObject); Var FinalQ : TMSQuery; begin FinalQ := TMSQuery.Create(nil); try FinalQ.Connection := TSQLQueryThread(Sender).FConnection; FinalQ.SQL.Text := 'Delete From '+TSQLQueryThread(Sender).FTempTable+' Where PID='+TSQLQueryThread(Sender).FID.ToString; FinalQ.Execute; finally FinalQ.Free; end; end; 4-main procedure for call Procedure TDMT.TH_Execute(Titr,SQLCMD:String); var SQLQueryThread: TSQLQueryThread; begin Inc(FQueryCounter); DMt.Exec_SQLClient('Insert Into '+Dmt.ProccessTable+'(PName,PId) Values ('+QuotedStr(Titr)+','+FQueryCounter.ToString+')'); SQLQueryThread := TSQLQueryThread.Create(FQueryCounter, SQLCMD, ClientConnection,DMt.ProccessTable); SQLQueryThread.OnTerminate := TH_QueryThreadTerminated; SQLQueryThread.FreeOnTerminate := True; end; 5- Now We are ready to call it DMT.TH_Execute(' any title ','Exec ..........'); 6- You can use the following command to display the list of running processes and their duration SQL.Text:='SELECT PID,Pname, Trim(CONVERT(CHAR,DATEDIFF(mi, StartDT, GETDATE())))+'':''+CONVERT(CHAR,DATEDIFF(ss, StartDT, GETDATE())% 60) Dis FROM '+DMt.ProccessTable; and finally we have controller for our program
-
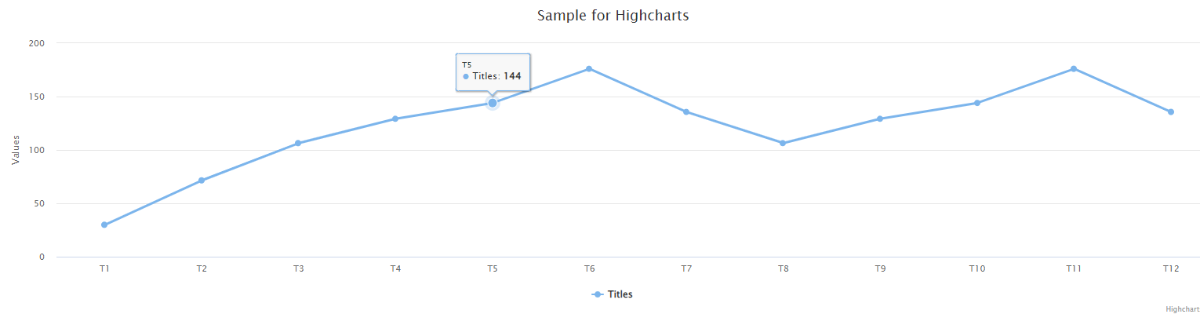
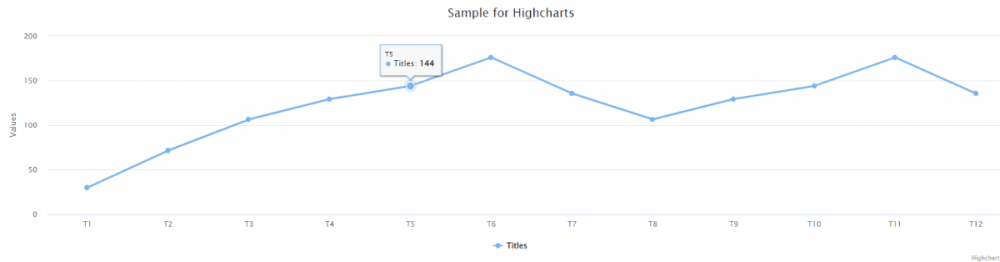
A simple example of a Hichart. You can add powerful charts to your software with a little creativity and with the help of HTML Remember 1- To get the libraries, you need to be connected to the Internet 2- If you cannot access the Internet, it is better to buy its libraries Highcharts Example
-
Someone asked about lable .tunilable { font-family: Arial, sans-serif; font-size: 16px; color: black; background-color: #fdfaf5; padding: 10px; border-radius: 5px; border: 1px solid #cccccc; box-shadow: 0px 0px 1px rgba(0, 0, 0, 0.7); } And Delphi code UniLabel1.Cls := 'tunilable'; UniLabel1.Caption := 'TuniLable component '; Here if you want to check another colors TUniLable In codepen
-
Using this site was a good experience for me If you are interested, you can see CSS of this photo and other CSS code for buttons in this link https://codepen.io/modiranco/pen/vYzqVEV
-
On this site, you can see what colors each brand uses for the theme. https://brandcolors.net/ don't forget big companies pay a lot of attention to psychology, work environment and audience's taste when choosing colors, and they spend a lot of money to choose these colors.
-
If you want to run the program again with a more beautiful page when an error occurs, use this code <style> body { font-family: "Tahoma", Arial, sans-serif; background-color: #f0f0f0; display: flex; flex-direction: column; justify-content: center; align-items: center; min-height: 100vh; margin: 0; } .message { font-size: 1.5rem; color: #0000A0; text-align: center; margin-bottom: 1rem; } .retry-link { font-size: 1.25rem; color: #A05050; text-align: center; text-decoration: none; border: 2px solid #A05050; border-radius: 5px; padding: 10px 20px; transition: all 0.3s; } .retry-link:hover { background-color: #A05050; color: #fff; } </style> </head> <body> <p class="message">[###message###]</p> <p><a class="retry-link" href="[###url###]">Restart Program</a></p> </body>
-
The first step in creating CSS is to use its common formats. But if you don't feel like formatting CSS or you have a messed up CSS, use this site and see the miracle. https://www.cleancss.com/css-beautify/ for example body{font-family:Georgia, Times, serif;color:purple;background-color:#d8da3d}h1{font-family:Helvetica, Arial} to body { font-family: Georgia, Times, serif; color: purple; background-color: #d8da3d } h1 { font-family: Helvetica, Arial }
-
سلام راستشو بخواهید من کلا متوجه نشدم چی نیاز دارید ولی موضوع بنظرم جالب رسید می توانید ی کمی در موردش بیشتر توضیح بدهید و بجای کد ، خود ایده را بیان کنید؟
-
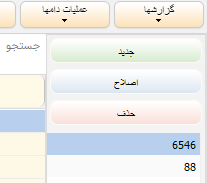
Even though I installed the latest version, after 3 days of wasted time, I found that the problem still exists in the exporter and all my Excel outputs are affected. In picture, you can see 2 Bigint from the table, which are different, but in Excel, the output of these two series is the same. I try to replace exporter with this code but problem still exist and I think unidbgrid have problem with bigint yet.

-
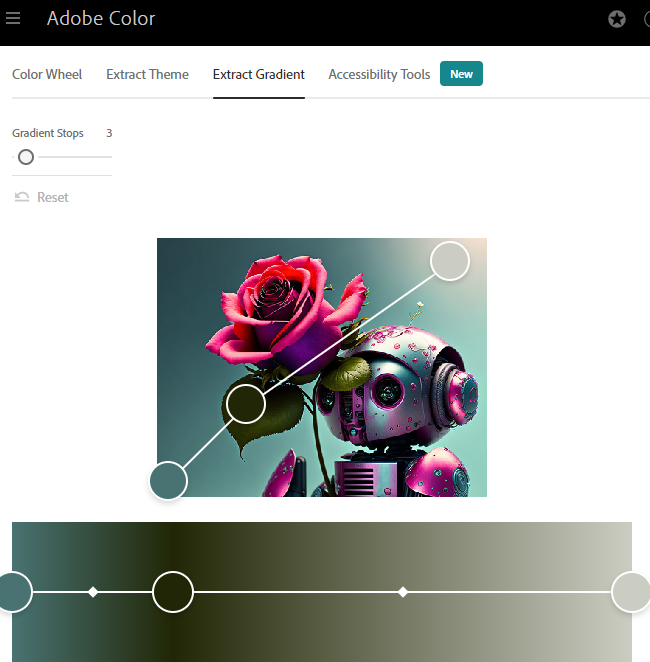
Another powerful site to detect colors is https://color.adobe.com/ In this site in Accessibility Tools you can choice an image to extract colors
-
A useful site for testing CSS https://codepen.io/ In this site , start a new pen and put the CSS code in the CSS section .tunibutton { display: inline-block; border-radius: 4px; background-color: #2196F3; color: #fff; font-size: 14px; font-weight: 500; padding: 8px 16px; text-align: center; text-decoration: none; text-transform: uppercase; transition: background-color 0.3s; } .tunibutton:hover { background-color: #1976D2; } .tunibutton:active { background-color: #0D47A1; } and enter a simple code in the HTML section to generate, for example, a Button <button class="tunibutton">Click me!</button>
-
One of the best sites for producing beautiful CSS. You can give it a photo and download its color combination code /* CSS HEX */ --blue-ncs: #2589bdff; --cerulean: #187795ff; --caribbean-current: #38686aff; --ash-gray: #a3b4a2ff; --dun: #cdc6aeff; /* CSS HSL */ --blue-ncs: hsla(201, 67%, 44%, 1); --cerulean: hsla(194, 72%, 34%, 1); --caribbean-current: hsla(182, 31%, 32%, 1); --ash-gray: hsla(117, 11%, 67%, 1); --dun: hsla(46, 24%, 74%, 1); /* SCSS HEX */ $blue-ncs: #2589bdff; $cerulean: #187795ff; $caribbean-current: #38686aff; $ash-gray: #a3b4a2ff; $dun: #cdc6aeff; /* SCSS HSL */ $blue-ncs: hsla(201, 67%, 44%, 1); $cerulean: hsla(194, 72%, 34%, 1); $caribbean-current: hsla(182, 31%, 32%, 1); $ash-gray: hsla(117, 11%, 67%, 1); $dun: hsla(46, 24%, 74%, 1); /* SCSS RGB */ $blue-ncs: rgba(37, 137, 189, 1); $cerulean: rgba(24, 119, 149, 1); $caribbean-current: rgba(56, 104, 106, 1); $ash-gray: rgba(163, 180, 162, 1); $dun: rgba(205, 198, 174, 1); /* SCSS Gradient */ $gradient-top: linear-gradient(0deg, #2589bdff, #187795ff, #38686aff, #a3b4a2ff, #cdc6aeff); $gradient-right: linear-gradient(90deg, #2589bdff, #187795ff, #38686aff, #a3b4a2ff, #cdc6aeff); $gradient-bottom: linear-gradient(180deg, #2589bdff, #187795ff, #38686aff, #a3b4a2ff, #cdc6aeff); $gradient-left: linear-gradient(270deg, #2589bdff, #187795ff, #38686aff, #a3b4a2ff, #cdc6aeff); $gradient-top-right: linear-gradient(45deg, #2589bdff, #187795ff, #38686aff, #a3b4a2ff, #cdc6aeff); $gradient-bottom-right: linear-gradient(135deg, #2589bdff, #187795ff, #38686aff, #a3b4a2ff, #cdc6aeff); $gradient-top-left: linear-gradient(225deg, #2589bdff, #187795ff, #38686aff, #a3b4a2ff, #cdc6aeff); $gradient-bottom-left: linear-gradient(315deg, #2589bdff, #187795ff, #38686aff, #a3b4a2ff, #cdc6aeff); $gradient-radial: radial-gradient(#2589bdff, #187795ff, #38686aff, #a3b4a2ff, #cdc6aeff);
-
I don't think so Artificial intelligence such as ChatGapt can only suggest some codes based on their information database, which sometimes they are not sure of their accuracy. But software writing needs to understand the goal and idea at first Such AIs need to be programmed to access supervised learning so that they can guess the intent of the idea
-
Simple CSS structure CSS, there are several ways to define colors. Here are some examples of how you can define colors in CSS: Use a color name: In CSS, some colors have special names that you can use to define the color, such as red, blue, or green. For example, if you want to make some text red, you can use the following code: color: red; Use a hexadecimal value: A hexadecimal value is a combination of six digits that represent the amount of red, green, and blue in a color. For example, the color white is represented by the hexadecimal value #FFFFFF. If you want to use a hexadecimal value to define a color, you can use the following code: color: #FF0000; /* red */ Use an RGB value: An RGB value is similar to a hexadecimal value, but instead of using six digits, you use three numbers to represent the amount of red, green, and blue in a color. For example, the color white can be represented by the RGB value rgb(255, 255, 255). If you want to use an RGB value to define a color, you can use the following code: color: rgb(255, 0, 0); /* red */ Now, if you want to build a theme with colors, you can define the colors you want to use in your theme using the methods above, and then apply those colors to different elements in your HTML using CSS selectors. For example, you might define your theme colors like this: :root { --primary-color: #007bff; --secondary-color: #6c757d; --background-color: #f8f9fa; } Then, you can use these colors to style different elements in your HTML, like this: body { background-color: var(--background-color); } h1 { color: var(--primary-color); } a { color: var(--secondary-color); } By using variables to define your colors, you can easily change the colors throughout your entire website just by updating the values of the variables. In CSS, linear gradient is a type of color function that allows you to create a gradient effect where one color transitions into another in a linear direction. The linear-gradient() function is used to create a linear gradient and takes two or more color values as its arguments. Here's an example of how to use the linear-gradient() function: background-image: linear-gradient(to bottom, #000000, #ffffff); This will create a linear gradient that starts at the top and transitions from black (#000000) to white (#ffffff) as it moves towards the bottom of the element. The to keyword is used to specify the direction of the gradient. In this example, to bottom indicates that the gradient should start at the top of the element and move towards the bottom. Other values you can use for the direction include to top, to left, to right, to bottom left, to bottom right, to top left, and to top right. You can also add more than two colors to the linear-gradient() function to create more complex gradients. Here's an example: background-image: linear-gradient(to bottom, #000000, #333333, #ffffff); This will create a gradient that starts at black (#000000), transitions to dark gray (#333333), and then transitions to white (#ffffff) as it moves towards the bottom of the element. In addition to the linear-gradient() function, CSS also provides other gradient functions, such as radial-gradient(), which creates a gradient that radiates from a central point. In CSS, radial-gradient() is a function that allows you to create a gradient effect that radiates from a central point to the edges of an element. The function takes one or more color stops as arguments, which define the colors and positions of the gradient. Here's an example of how to use the radial-gradient() function: background-image: radial-gradient(circle at center, #ffffff, #000000); This will create a radial gradient that starts at the center of the element and transitions from white (#ffffff) to black (#000000) as it moves towards the edges. The circle at center part of the code specifies the shape and position of the gradient. circle indicates that the gradient should be circular in shape, and at center indicates that the center of the gradient should be at the center of the element. Other values you can use for the shape include ellipse and closest-side, closest-corner, farthest-side, farthest-corner for the position you can specify it using length, percentage or keyword values. You can also add more color stops to the radial-gradient() function to create more complex gradients. Here's an example: background-image: radial-gradient(circle at center, #ffffff, #666666 25%, #000000); This will create a gradient that starts at white (#ffffff), transitions to gray (#666666) at 25% of the way to the edges, and then transitions to black (#000000) as it reaches the edges.
-
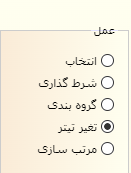
CSS for UniRadioGroup .uni-radio-group { background-color: #f2f2f2; border-radius: 5px; color: #fff !important; background-image: linear-gradient(to left, Ivory, AntiqueWhite ) !important; border-color: #ccc; } .uni-radio-group .uni-radio-button { color: #333; } .uni-radio-group .uni-radio-button:hover { background-color: #ccc; }
-
The chat was interest , but simple project for Css in UniPopupMenu ( @Sherzod solution ) is here (font / height / color /...) pop1.rar
-
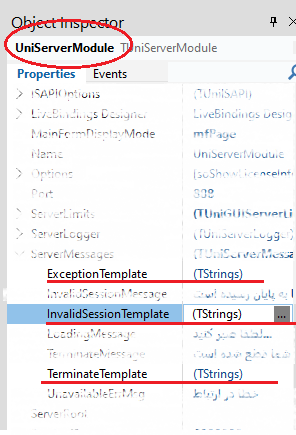
continue with chatGPT I need a Css simple code for popup menu in unigui Sure, here is an example of a CSS code for a simple popup menu in UNIGUI: .uni-popup { position: absolute; display: none; background-color: #f1f1f1; min-width: 160px; box-shadow: 0px 8px 16px 0px rgba(0,0,0,0.2); z-index: 1; } .uni-popup a { color: black; padding: 12px 16px; text-decoration: none; display: block; } .uni-popup a:hover { background-color: #ddd; } .uni-popup.show { display: block; } To use this CSS code, you need to add a CSS class to the element that will trigger the popup menu. For example, if you have a button that should open the menu, you can add the uni-popup class to it. Then, you can use JavaScript to toggle the show class on the menu element when the button is clicked. Here is an example of JavaScript code that shows how to toggle the show class: var popup = document.querySelector(".uni-popup"); var button = document.querySelector(".popup-button"); button.addEventListener("click", function() { popup.classList.toggle("show"); }); In this example, we first select the menu element using the querySelector method and save it to the popup variable. We also select the button element that will open the menu and save it to the button variable. We then add an event listener to the button that will toggle the show class on the menu when the button is clicked. and how i can use it in my unigui project To use this CSS code in your UNIGUI project, you can follow these steps: Open your UNIGUI project in the Delphi IDE. In the Project Manager, double-click on the MainForm to open it. In the Object Inspector, find the element (such as a button) that will trigger the popup menu. In the StyleName property of the element, enter uni-popup. Right-click on the MainForm and select View As Text. In the MainForm.fmx file that opens, scroll down to the <style> tag. Copy and paste the CSS code I provided earlier inside the <style> tag. Save and close the MainForm.fmx file. In the Delphi IDE, right-click on the MainForm and select View As Form to go back to the visual form designer. Add the JavaScript code I provided earlier to the OnReady event of the MainForm or to the OnClick event of the element that triggers the popup menu. That's it! You should now have a simple popup menu in your UNIGUI project that uses CSS and JavaScript. Note that you may need to adjust the CSS code to fit the specific needs of your project. tanks , i want to assign this css to all popupmenu in my project in runtime , how i can do it? To apply the CSS code to all popup menus in your UNIGUI project at runtime, you can use the following steps: In the OnShow event of the form where the popup menus will be used, you can iterate through all the TUniPopupMenu components on the form using a loop. For each TUniPopupMenu component, you can set its StyleName property to "uni-popup". You can then add the CSS code to the UniHTMLFrame.Document.Head property of the TUniFrame or TUniForm where the popup menus will be used. This will ensure that the CSS is applied to all popup menus in the form. Here is an example code snippet that you can use in the OnShow event of your form: procedure TForm1.UniFormShow(Sender: TObject); var i: Integer; begin // Assign the CSS class to all TUniPopupMenu components on the form for i := 0 to ComponentCount - 1 do begin if Components[i] is TUniPopupMenu then TUniPopupMenu(Components[i]).StyleName := 'uni-popup'; end; // Add the CSS code to the UniHTMLFrame.Document.Head property UniHTMLFrame.Document.Head.AddElement( 'style', 'type="text/css"', '.uni-popup { ' + 'position: absolute; ' + 'display: none; ' + 'background-color: #f1f1f1; ' + 'min-width: 160px; ' + 'box-shadow: 0px 8px 16px 0px rgba(0,0,0,0.2); ' + 'z-index: 1; ' + '} ' + '.uni-popup a { ' + 'color: black; ' + 'padding: 12px 16px; ' + 'text-decoration: none; ' + 'display: block; ' + '} ' + '.uni-popup a:hover { ' + 'background-color: #ddd; ' + '} ' + '.uni-popup.show { ' + 'display: block; ' + '}'); end; This code will assign the "uni-popup" class to all TUniPopupMenu components on the form and add the CSS code to the UniHTMLFrame.Document.Head property. Note that you may need to adjust the CSS code to fit the specific needs of your project.
-
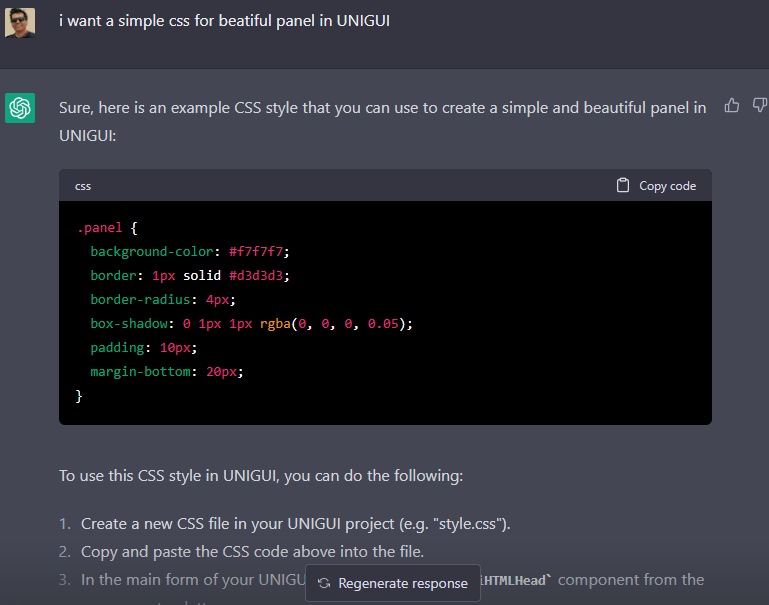
i want a simple css for beatiful panel in UNIGUI Sure, here is an example CSS style that you can use to create a simple and beautiful panel in UNIGUI: cssCopy code .panel { background-color: #f7f7f7; border: 1px solid #d3d3d3; border-radius: 4px; box-shadow: 0 1px 1px rgba(0, 0, 0, 0.05); padding: 10px; margin-bottom: 20px; } To use this CSS style in UNIGUI, you can do the following: Create a new CSS file in your UNIGUI project (e.g. "style.css"). Copy and paste the CSS code above into the file. In the main form of your UNIGUI application, add a TUniHTMLHead component from the component palette. Set the ExtraHeader property of the TUniHTMLHead component to the following: bashCopy code <link rel="stylesheet" type="text/css" href="style.css"> In the form where you want to use the panel, add a TUniPanel component from the component palette. Set the CustomStyle property of the TUniPanel component to "panel". Now, the TUniPanel component should have the CSS style applied to it, and it should have a simple and beautiful appearance. You can further customize the CSS style to your liking by modifying the values of the various properties in the style.
-
 yes, I understand The idea of this site was very nice and I thought that maybe we could do something similar ChatBase.co
 -
Thank you for your guidance Yes, I read the code and saw how you called the function. What was important was the creativity used in the use of the UNIGUI. And a question Can we limit the answers to the analysis of a text?
-
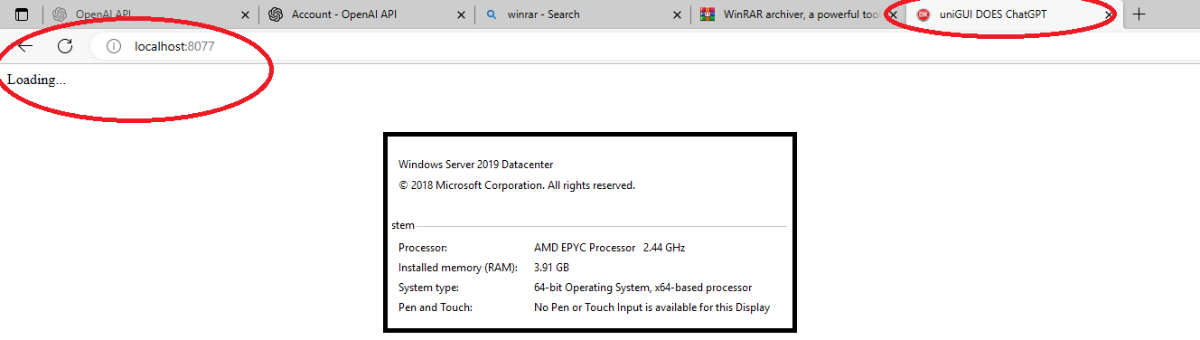
Hello Fred Thank you for your good program It doesn't work for me and it stays on loading Do you have any suggestions? (You can see the server specifications in the photo)