Leaderboard


Popular Content
Showing content with the highest reputation since 03/19/24 in Posts
-
News https://store.falconsistemas.com.br Added 4 additional months of subscription for all components for all users. From now on all components have 1 year for fixes, new components and improvements for all users 🚀🚀🚀.4 points
-
wishing you all a very happy Eid2 points
-
Your 60% renewal price will be always valid. It never expires.2 points
-
Hello, Yes, this is an issue for "for attribute doesn't match any element id". Need to check.2 points
-
<p style="text-align:center;"><strong>Arama kriterlerinize ait bir kayıt bulunamadı..</strong></p><p style="text-align:center;"><strong>Eğer Pasif bir müşteri arıyorsanız Sol Menü'den Pasif Müşteriler Menüsünden arama yapabilirsiniz.</strong></p>1 point
-
Please use JSCallGlobal(FMarkerJSName+'.setLatLng', [JSArray([Latitude,Longitude])]); I added SetLatLong procedure to UniMapMarker. With the new build, you will be able to use it as UniMap1.GetMarkerById(1).SetLatLong(Lat,Long)1 point
-
Copying all the correct BPL's from various locations was quite a mission, but having done that, I'm now able to successfully run the ISAPI dll with "Link with runtime packages" checked. Using this option, the size of the dll shrank from 550MB to 25MB, so I'm quite happy!1 point
-
I'm sorry for wasting your time. I worked late. There is an error in my project, I immediately decided to make a test example, got a result similar to my error and did not check the obvious things. Thank you for such attentive support!1 point
-
For now it's just Google Maps. I'm receiving a lot of requests to develop the same component supporting other maps, we can think.1 point
-
In this topic , I try to share some css for you . For dear novices I will explain, you have this code in UniServerModule -- > CustomCSS Copy and assign the object to the CLS section in Layoutconfig when designing, or use this command when executing bitbtn1.JSCall('addCls', [' ...... ']); you can do if you like first, this sites can help to build css runtime https://htmlcheatsheet.com/css/1 point
-
This post may also be useful:1 point
-
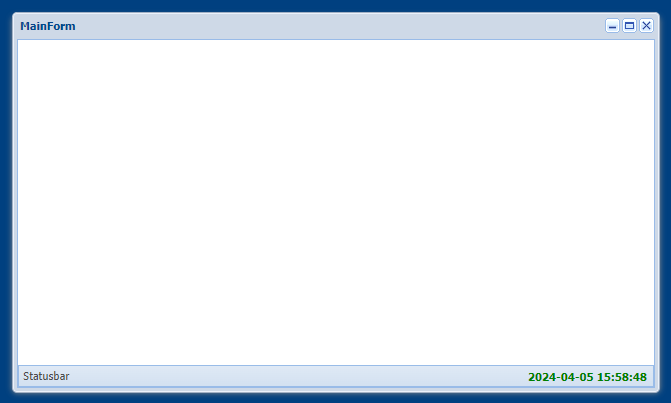
Let's add TrayClock to UniStatusBar (can be added to other controls). 1. initialization UniAddCSSLibrary('build/packages/ux/classic/classic/resources/ux-all.css', False, [upoFolderJS, upoPlatformDesktop]); UniAddJSLibrary('build/packages/ux/classic/ux.js', False, [upoFolderJS, upoPlatformDesktop]); 2. UniStatusBar.ClientEvents.ExtEvents -> function afterrender(sender, eOpts) { if (Ext.isDefined(Ext.ux)) { sender.add({ xtype: 'tbfill' }); sender.add( new Ext.ux.desktop.TrayClock() ); } } Let's modify by adding a style, a time format, and an update time of one second. (2). function afterrender(sender, eOpts) { if (Ext.isDefined(Ext.ux)) { sender.add({ xtype: 'tbfill' }); sender.add(new Ext.ux.desktop.TrayClock({ tpl: '<span style="color: green; font-weight: bold;">{time}</span>', //default = '{time}' timeFormat: 'Y-m-d H:i:s', //default = 'g:i A' updateTime: function() { var me = this, time = Ext.Date.format(new Date(), me.timeFormat), text = me.tpl.apply({ time: time }); if (me.lastText !== text) { me.setText(text); me.lastText = text; } me.timer = Ext.defer(me.updateTime, 1000, me); } })); } }
 1 point
 -
With the help of master @Sherzod I managed it, here is an example Stay here, thank you very much. TestTimer.zip1 point
-
1 point
-
Hello, I will give you an example.1 point
-
1 point
-
At least share the text to check...1 point
-
Sir I'm using UniGUI Complete Professional V1.90.0.1560 in RAD C++ Builder 10.4 Update 2. I'm getting an Ajax error when trying to assign a new title to a stream of a UniChart. I have the following procedure: void __fastcall TMainForm::SetNewTitle(TUniChart *ThisChart, int StreamNo) { UnicodeString NewTitle; NewTitle = "New Title"; if (StreamNo==0) ThisChart->JSInterface->JSCall((UnicodeString)L"chart.series[0].setTitle",ARRAYOFCONST((NewTitle))); if (StreamNo==1) ThisChart->JSInterface->JSCall((UnicodeString)L"chart.series[1].setTitle",ARRAYOFCONST((NewTitle))); if (StreamNo==2) ThisChart->JSInterface->JSCall((UnicodeString)L"chart.series[2].setTitle",ARRAYOFCONST((NewTitle))); } As long as the UniChart has 3 UniLineSeries, everything works fine when I call SetNewTitle(UniChart,0); SetNewTitle(UniChart,1); SetNewTitle(UniChart,2); But as soon as I use 3 UniBarSeries, UniAreaSeries or any other series on the UniChart, then calling SetNewTitle for all 3 series gives an Ajax error: "Cannot read properties of undefined (reading 'SetTitle')" The easiest fix would be to allow us to set the Title property for each Series in the SeriesList: UniChart->SeriesList->Series[0]->Title = "New Title"; UniChart->SeriesList->Series[1]->Title = "New Title"; UniChart->SeriesList->Series[2]->Title = "New Title"; Then we don't even have to use the JSCall which is not working for UniBarSeries, UniAreaSeries and other series in C++Builder. By the way, I have to tell you that the uniGUI framework is most amazing. I only have the greatest respect for your work, you are a genius!! If only we could fix this bug then I will be a vey happy customer…1 point
-
Hello, I am looking for a solution.1 point
-
Sure, I will try tomorrow and post it here!1 point
-
You are the best, simply.1 point
-
Hello, Try this approach: MainForm.Script -> Ext.override(Ext.calendar.view.Day, { allowSelection: false }); Ext.override(Ext.calendar.view.Week, { allowSelection: false }); Ext.override(Ext.calendar.view.Month, { allowSelection: false });1 point
-
Solved (timing issue)1 point
-
Excellent. Thank you!1 point
-
Спасибо попробую.1 point
-
This js library may help you: https://github.com/alexcorvi/heic2any/blob/master/docs/getting-started.md1 point
-
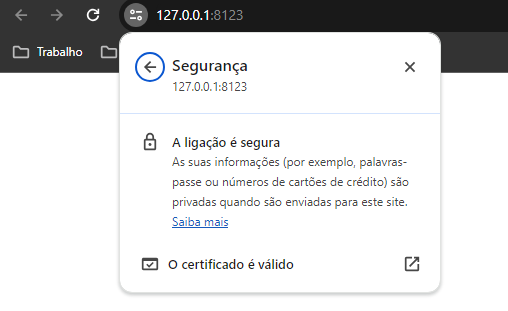
Hello @Abaksoft, your tip was of great help, however, in my case I don't need other devices to access the "server", just the computer itself that is compiling. So, I made a summary of the manual. 1 - Create the san.cnf file in the OpenSSL bin folder (C:\Program Files\OpenSSL-Win64\bin). The content of the file looks like this: [req] default_bits = 2048 distinguished_name = req_distinguished_name req_extensions = req_ext x509_extensions = v3_req prompt = no [req_distinguished_name] countryName = XX stateOrProvinceName = XX localityName = XXXX organizationName = XXXX commonName = 127.0.0.1: Self-signed certificate [req_ext] subjectAltName = @alt_names [v3_req] subjectAltName = @alt_names [alt_names] IP.1 =127.0.0.1 Replace the "X" with your parameters 2 - Open cmd as admin 2.1 - cd C:\Program Files\OpenSSL-Win64\bin 3 - Run command openssl genrsa -out root.key 2048 openssl req -x509 -days 3650 -new -nodes -key root.key -out root.pem -config san.cnf openssl req -x509 -nodes -days 3650 -newkey rsa:2048 -keyout key.pem -out cert.pem -config san.cnf 4 - You created the three files (root.pem, cert.pem, Key.pem) inside the bin folder. Copy these three files to the root directory where the .exe of your unigui project is located. 5 - Finally, open the Windows certificate manager (certmgr.msc), navigate to the "trusted root certificate authorities" folder and import the cert.pem file Close browser e run project.
 1 point
 -
Hi Farshad, thanks for the quick reply and the note about the subscription. I'll get back to them.1 point
-
1 point
-
You should still be getting a response of some kind from the browser. Can you share that? Do you mind sharing the url so we can try to help with the diagnoses.1 point
-
Hello As a workaround, open UniMap.pas, and add the below into line 1752 IfThen(autoClose=false, 'closeOnClick', ''), JSStatement('null'), So it will look like this
 1 point
 -
Добрый день! Спасибо! Заплатили.1 point
-
Hi. I add here solution that maybe useful for someone: https://www.experts-exchange.com/questions/26933022/How-to-lock-out-a-file-or-path-from-within-a-Delphi-app.html question: How to lock out a file or path from within a Delphi app? proposal: try this; rename the folder you want to test to; from: New Folder1 to: New Folder1.{ED7BA470-8E54-465E-825C-99712043E01C} So, when your Delphi program rans?, it rename back to New Folder1 rename file code; lock folder; renamefile(New Folder1, New Folder1.{ED7BA470-8E54-465E-825C-99712043E01C}); and back unlock folder; renamefile(New Folder1.{ED7BA470-8E54-465E-825C-99712043E01C}, New Folder1 ); explanation: {ED7BA470-8E54-465E-825C-99712043E01C} is one of several special names that the Windows systems recognize and treat in different ways. For instance, the control panel 'folder' has a special icon and there are some things you are not allowed to do with the folder or its contents. I think this particular folder identification was introduced in Win7. Many writers have named it the "God" folder. more info: https://en.wikipedia.org/wiki/Windows_Master_Control_Panel_shortcut https://answers.microsoft.com/en-us/insider/forum/all/god-mode-other-windows-10-tips-tricks/9e81e023-9179-4b59-9937-f1e9aab537b41 point
-
Overview I would like to request an enhancement to the TUniMap component that introduces advanced layer management capabilities, allowing for more flexible and dynamic map presentations in UniGUI applications. The proposed extension would facilitate the handling of various map layers, including bitmap and vector layers, with features such as custom Z-indexing and transparency control. Proposed Features Layer Type Enumeration: Introduce TMapLayerType to distinguish between different types of map layers (e.g., bitmap, vector). Base Map Layer Class: Implement a TMapLayer base class with properties like ID, LayerType, and ZIndex, and methods for adding to the map, removing from the map, and updating the Z-index. Bitmap and Vector Layer Classes: Create TBitmapLayer and TVectorLayer subclasses to manage specific layer types, including functionalities for setting transparency (for bitmap layers) and handling vector data. Extended UniMap Component: Develop TExtendedUniMap, an enhanced version of TUniMap, with capabilities to add, remove, update, and reorder layers dynamically. This component should manage a collection of TMapLayer objects, offering a unified interface for layer manipulation. Justification In many mapping applications, the need to dynamically adjust the visibility and order of layers is crucial for providing users with a clear and informative view of the data. The ability to change the transparency of layers, apply blending modes, and manipulate the stacking order (Z-index) of both bitmap and vector layers would greatly enhance the flexibility and utility of the TUniMap component. Example Use Cases Environmental Monitoring: Displaying real-time data overlays (e.g., weather, pollution) on top of a base map, with user-controlled transparency for comparative analysis. Geospatial Analysis: Layering thematic maps in a specific order, adjusting visibility and order to highlight spatial relationships or patterns. Urban Planning: Overlaying architectural plans or development proposals on existing city maps, allowing for interactive exploration of future changes.1 point
-
Hi, How can perform calculations (or checks) only on the client side? I mean field c=field a+field b, but directly in the client store or on the values present directly in the editors (DB) that are in the form. But all on client side, without making ajax calls to the server? (Server dataset must be updated on post record) Thank you1 point
-
Hello, Let see an example : 1. Assume, you have a grid where we can see all money operations for a person (100 lines) and at the last column its current balance. 2. Assume, you just commit an update on line 5 : update TOperations set amount = 777 where (IDOperation = 23000) At this point, the server will commit this without problem as the transaction is fast ! And you want to see, not only the refreshed record at line 5, but all records after, affected the current balance. 3. So, obviously you will say : Ok, i will Re-Open the Query and show the new balance colum. Humm....the problem is here ! 4. In web development, we have to think differently : assume you have a mini server, with low ressources and 500 opened sessions in real time. The 500 users are doing updates, with re-open (refreshing). Not tested, but obviouly, our mini server will make a face 🥶 5. Here is where comes "Client Calculation" : After updating line 5, we don'nt have to re-open the query (saturate the server), but work only on the grid locally, client side Ovoid technic .Edit .Post as it is server side. 6. Working on the grid locally, client side take advantage of javascript already integrated on known browsers as Chrome, Opera, FireFox, etc... 7. JavaScript on client side (Client Calculation) allows you to refresh the 95 lines in a flash time, without the need to re-call the server, nor even updating anything on sever. 8. I think FmSoft team is doing her best to release a next build with this feature. 😊1 point
-
Using professional edition 1.95.0.15801 point
-
Hi @Farshad Mohajeri, thanks for the clarification. Sorted out.1 point
-
They are used to customize ExtJS Themes. And in the case of uniGUI, they are useless...1 point
-
calm down, calm down, don't rush, one solution at a time, please! :-)1 point
-
my css collection, used in servermodule, customcss /*------- CONFIGURAÇÕES DAS TABS ---------------- */ /*Altera a parte superior da Tab, incluso tabs*/ .x-tab-default-top { border-top-left-radius: 0; /*Radius arredonda os cantos*/ border-top-right-radius: 0; border-bottom-right-radius: 0; border-bottom-left-radius: 0; padding: 5px 10px 10px 10px; /*T-R-B-L altura dos botões*/ border-width: 0 0 0 0; /*Borda dos Botões da Tab*/ border-style: none ; /*solid*/ border-color: #32404e; background-color: #ffffff; /* #1e3b5e Cor do Botão da page */ background-image: none; } /*Cor da fonte do botão da Tab ativo*/ .x-tab-default-active .x-tab-inner { color: #000000; } /*Distância do botão fechar para as margens*/ .x-tab-default .x-tab-close-btn { top: 4px; right: 4px; } /*Intensidade do fundo mask-box ajuste a Opacidade*/ .x-mask { opacity: 0.4; background: rgb(0, 0, 0) none repeat scroll 0% 0%; } /*Opções do Hold Overlay*/ #holdon-overlay { opacity: .7 !important; } /*Retira as bordas dos paineis*/ .x-panel-body-default { border-width: 0; border-style: none; padding: 0px 0px 0px 0px; /*Margem do painel da tab*/ } /*Coloca sombra em qualquer Panel*/ .pnlcard { box-shadow: 0 8px 6px -6px gray !important; background:white !important; border: 1px solid silver !important; } /* .x-tab-bar-default-horizontal { height: 0px; }*/ /* Cores da Tab*/ .x-tab-bar-default{ border-style:none; border-width:0 0 0; border-color:#ffffff; background-color:#ffffff; background-image: none; } /*Cor fonte pag ativa*/ .x-tab-active .x-tab-inner { color: #ffffff !important; } /*Altura dos botões em relação a borda inferior da Tab*/ .x-tab-bar-default-top { padding: 5px 0px 5px 0px; /* T-R-B-L */ } /*Modifica a barra inferior do botão*/ .x-tab-bar-strip-default { border-style: solid; padding: 3px 3px 3px 3px; /*T-R-B-L altura dos botões*/ border-color: transparent; background-color: #32404e; } /*Cores de fontes do label da Tab em foco*/ .x-tab .x-tab-inner { font-weight: bold; color:#000000; border: none;} .x-tab-over .x-tab-inner { font-weight: bold; color:#7c7c7c; border: none;} .x-tab-active .x-tab-inner { font-weight:bold; color:#ffffff; border: none;} /*Cor tab mouse over*/ .x-tab-over.x-tab-default-top, .x-tab-over.x-tab-default-left, .x-tab-over.x-tab-default-right { background-image: none; background-color: #e3e3e3; } /*Cor da Fonte da Tab Ativa*/ .x-tab.x-tab-active.x-tab-default .x-tab-inner-default { color: #ffffff; } /*Cor da Tab Ativa*/ .x-tab.x-tab-active.x-tab-default-top { background-image: none; background-color: #32404E; } /*Cor da Tab ativa quando perde o foco*/ .x-tab.x-tab-active.x-tab-default-top { background-image: none; background-color: #32404e; } /*Cor da Fonte da Tab desativada*/ .x-tab.x-tab-disabled.x-tab-default .x-tab-inner-default { color: #ffffff; } /*Cor da Tab Desativada*/ .x-tab.x-tab-disabled.x-tab-default-top, .x-tab.x-tab-disabled.x-tab-default-left, .x-tab.x-tab-disabled.x-tab-default-right { background-image: none; background-color: #e6e6e6; } /*Cor de Foco com teclas*/ .x-keyboard-mode .x-tab-focus.x-tab-default { border-color: #e6e6e6; background-color: #e6e6e6; } /*cor do botão da tab quando foco em tab ativa*/ .x-keyboard-mode .x-tab-focus.x-tab-over.x-tab-default { border-color: #32404e; background-color: #32404e; } /*Cor do botão da tab quando recebe o foco*/ .x-keyboard-mode .x-tab-focus.x-tab-active.x-tab-default { border-color: #32404e; background-color: #32404e; } /*---------- CONFIGURAÇÕES PADRÃO ----------------------*/ /*Colori e Arredonda os Edits*/ /*Fora de foco*/ .x-form-text { border-radius: 1px; -moz-border-radius: 1px; -webkit-border-radius: 1px; border-color: #E0E0E0; box-shadow: 1px 1px 1px #E0E0E0; } .x-form-text:focus, .x-form-text:hover, .x-form-text:active { /*Em foco*/ border-radius: 1px; -moz-border-radius: 1px; -webkit-border-radius: 1px; border:1px solid gray !important; background: #FFFFB4 !important;/*Amarelinho rgb(255, 255, 180)*/ box-shadow: 1px 1px 1px #E0E0E0;/*Cinza rgb(224, 224, 224)*/ } /*Muda cor dos botoes e remove bordas*/ /*Bordas dos botoes de login*/ .Borda{border-radius: 50px;} .Borda:hover{border-radius: 50px;} /*BtnVideoAula*/ .bntVideoAula { background:#047b4a !important;/*Cor escura*/ -webkit-transition: background 0.2s ease-in-out; transition: background 0.2s ease-in-out; /*border: none !important;*/ border-radius: 50px !important; } .bntVideoAula:hover { background:#06bd70 !important;/*Cor clara*/ -webkit-transition: background 0.2s ease-in-out; transition: background 0.2s ease-in-out; /*border: none !important;*/ border-radius: 50px !important; } /*BtnLogin*/ .bntLogin { background:#75a3a3 !important;/*Cor escura*/ -webkit-transition: background 0.2s ease-in-out; transition: background 0.2s ease-in-out; border: none !important; border-radius: 0px !important; } .bntLogin:hover { background:#a3c2c2 !important;/*Cor clara*/ -webkit-transition: background 0.2s ease-in-out; transition: background 0.2s ease-in-out; border: none !important; border-radius: 0px !important; } /*Remove sombra dos forms*/ .x-css-shadow { -webkit-box-shadow: none !important; -moz-box-shadow: none !important; box-shadow: none !important; } .VerticalCSS{ transform: rotate(-90deg); -webkit-transform: rotate(-90deg); /* Safari/Chrome */ -moz-transform: rotate(-90deg); /* Firefox */ -o-transform: rotate(-90deg); /* Opera */ -ms-transform: rotate(-90deg); /* IE 9 */ } .x-btn-default-large{ background-color: rgb(65, 65, 65) !important; background-image: none !important; border-width:0 !important; } .x-btn-default-large-over {background-color: rgb(85, 85, 85) !important;} .x-accordion-hd .x-tool-expand-top, .x-accordion-hd .x-tool-expand-bottom {background-position:0 -176px;} .x-accordion-hd .x-tool-collapse-top, .x-accordion-hd .x-tool-collapse-bottom {background-position:0 -224px;} .menubtn{ text-align: left; float: left; width: 70%; margin-left: 20px; margin-top: -2px; } .iconright{ text-align: right; float: right; width: 8%; margin-top: -6px; } .div100{ width: 100%; padding-top:5px; } .iconWhite .fa-sf-white{ color: white; } .iconYellow .fa-sf-white{ color: yellow; } .fa-sf-inverse { color: rgb(44, 69, 89); } .f-btn-transparent:focus, .f-btn-transparent:hover { border-color:rgb(97, 123, 145); background-color:rgb(97, 123, 145); } .btfocus:hover { border-color:#E0E0E0; background-color:#E0E0E0; } /*Bordas dos forms*/ .x-window-default{/*Falta atribuir em forms separados Login Suporte ficou muito Grande*/ background-color: white; border-color: #E0E0E0;/*Cinza rgb(224, 224, 224)*/ border-radius: 0px; border-style: none; border-width: 0px; border-height: 0px; padding: 0; /*height:519px !important; /*tamanho do seu form - 10px*/ /*width:669px !important; /*tamanho do seu form - 10px*/ } .NotValid { border-style: solid; border-width: 1px; border-color: Red; } /*Colorir Menu principal*/ /* ._treemenu .x-treelist, ._treemenu .x-treelist-row{ background-color: #2c4559;/*Cor Escura*/ /*} ._treemenu .x-treelist-row-over{ background-color: #252F38;/*Cor Clara*/ /*}*/ /*UniTreeMenu - Inicio*/ /* Aqui ira determina a COR DE Fundo do menu */ .x-treelist-nav { background-color: [[MENU_COLOR]] !important;/* #32404e; moccasin; */ background-repeat: no-repeat; background-attachment: fixed; background-image: url( 'https://gepimagens.ergonsistemas.com.br/Backgroud_620x1080.png'); /*background-image: url( 'files/Backgroud_Menu/Backgroud_4.png' );*/ background-position: 0px 50% !important; padding: 0 0 0 0; overflow: auto !important; scrollbar-width: thin; /*estilo do scrool para o mozilla */ scrollbar-color: #778088 #d6d9db; /*estilo do scrool para o mozilla */ } .x-treelist-nav .x-treelist-item-text { /*menu lado Esquerdo*/ color: White; /*cor da letra do menu*/ margin-left: 27px; /*27 espaçamento da esquerda para direita dos Itens do menu*/ margin-right: 15px; /*espaçamento da esquerda para direita dos Grupos do menu*/ font-size: 16px; /*tamanho das letras*/ line-height: 30px; /*altura da linha do menu*/ } .x-treelist-nav .x-treelist-item-icon:before, .x-treelist-nav .x-treelist-item-tool:before, .x-treelist-nav .x-treelist-item-expander { line-height: 30px; /* 44 é o padrao */ color: White; } /*Menu Expandidos*/ .x-treelist-nav .x-treelist-item-expanded { background-color: #324f67 !important; } /*Menu Selecionado*/ /*Modelo 1*/ .x-treelist-nav .x-treelist-item-selected > .x-treelist-row::before { background-color: #008ae6 !important; } /*Modelo 2*/ /*.x-treelist-nav .x-treelist-item-selected > .x-treelist-row { background-color: #008ae6 !important; }*/ /*Passa o mouse*/ .x-treelist-nav .x-treelist-row-over{ background-color: #808080 !important; } .x-treelist-nav::-webkit-scrollbar { width: 7px; height:7px; background:#d6d9db; } .x-treelist-nav::-webkit-scrollbar-track { background: rgba(0,0,0,0.1); } .x-treelist-nav::-webkit-scrollbar-thumb { border-radius: 7px; height:7px; background:#778088; } /* UniTreeMenu - Fim */ /* Altura da linha na Grid */ .GridLotacao .x-grid-column { height: 20px; } .GridLotacao .x-grid-cell { height: 20px !important; line-height: 20px !important; }1 point
-
Dears, I was finally able to do something: If one day, you will have to develop an Unigui app: - Under local network, - Without Internet, - Which requires an SSL (example Scann Camera) Then read the following: I thought, wrongly to create "Self Signed Certificate". Today, most of browsers reject them. So, after 3 days search, I understood that it was necessary to use another technic : Create a localhost Certificate by mkcert This is inspired by (thx to the Author) : https://technixleo.com/create-locally-trusted-ssl-certificates-with-mkcert-on-windows OK...Step by Step : 1. Installing mkcert on Windows 1.1 mkcert can be installed by Chocolatey To install Chocolatey, you must first ensure the Policy AllSigned Open PowerShell as Admin Get-ExecutionPolicy if Restricted then : Set-ExecutionPolicy AllSigned 1.2 To install Chocolatey see https://chocolatey.org/install In PowerSehlle type (in a single line): Set-ExecutionPolicy Bypass -Scope Process -Force; [System.Net.ServicePointManager]::SecurityProtocol = [System.Net.ServicePointManager]::SecurityProtocol -bor 3072; iex((New-Object System.Net.WebClient).DownloadString('https://community.chocolatey.org/install.ps1')) 1.3 install mkcert In PowerSehlle type: choco install mkcert The mkCert Directory (by default) is: C:\Users\...\AppData\Local\mkcert 2. Generate my 2 pem files In PowerSehlle type: mkcert -install This will generate 2 files in C:\Users\...\AppData\Local\mkcert: rootCA.pem rootCA-key.pem 3. Generate a localhost.p12 Certificate In PowerSehlle type: mkcert -pkcs12 localhost This will generate localhost.p12 certificate which will be in the PowerShell directory, ie: ..\System32 4. Import the localhost Certificate Touche Win + R key: mmc File > Add > Certificates > Add Computer account local computer OK Right click / on WEB Hosting Certificates > All Tasks Machine Room Select localhost.p12 Certificate Next specify the password (default): changeit Check: Key Exportable Place of the Certificate on : Web Hosting (dépend on your windows langage : example for french : Hébergement Web) This will create 2 Certificates (in Web Hosting): - localhost - mkcert myDESKTOP-xxx 5. Project Unigui Requires 3 files: cert.pem key.pem root.pem Do not use root.pem = rootCA.pem ( C:\Users\...\AppData\Local\mkcert ) key.pem = rootCA-key.pem ( C:\Users\...\AppData\Local\mkcert ) wich are generated by mkcert. Use instead the new 3 files, obtained online (by converting the p12 file in a new global pem file) 5.1 Split localhost.p12 into 3 Files You can obtain the 3 files via a conversion of the Certificate: localhost.p12 Use Online: https://www.sslshopper.com/ssl-converter.html - Upload the Certificate File: localhost.p12 - indicate the type: PFX/PCKC#12 - Convert To: Standard PEM - Password: changeit You will get global File, containing 3 blocks : start ...end Separate them with Notebook, and save them into 3 files: The first = cert.pem The second = root.pem The third = key.pem 5.2 Compile your project and run it : https://localhost:8077/ is Secure Have fun... ___________________ PS: if you are interesting by an easy way to scan BareCode via your Android device (wich requires an SSL url) you can use Falcon Store - Components Delphi from our Friend Marlon. Very fast and light ! http://forums.unigui.com/index.php?/topic/11359-falcon-store-components-delphi-httpsstorefalconsistemascombr/#comment-602601 point
-
Well , kind of... lol
 1 point
 -
Use cellIndex function celldblclick(sender, td, cellIndex, record, tr, rowIndex, e, eOpts) { //cellIndex-1 }1 point
-
Dear Friends, Here is in attachment a good way to memorize centering text on touch Mobile. Enjoy... Mobile_Lecons.7z1 point
-
procedure TMainForm.UniFormCreate(Sender: TObject); begin UniComboBox1.MinQueryLength := 100; end; procedure TMainForm.UniComboBox1Change(Sender: TObject); var I: integer; begin for I := 0 to 3 do begin UniComboBox1.Items.Add(IntToStr(random(200))) ; end; (Sender as TUniComboBox).JSInterface.JSCallDefer('expand', [], 200); end;1 point
-
We already added this property. Please check inputType1 point
-
Hello, One of the possible solution I think 1. CustomCSS: .x-grid-group-hd-collapsed .x-grid-group-title { background-image: none; } 2. UniDBGrid1 -> OnAfterLoad event: procedure TMainForm.UniDBGrid1AfterLoad(Sender: TUniDBGrid); begin UniDBGrid1.JSInterface.JSCall('view.features[0].collapseAll', []); end;1 point
-
Boa Noite Carlos, Anexo esta um exemplo para geração da DLL. Também tive este mesmo problema no inicio, o mesmo não gerava a DLL, abaixo segue o que eu fiz para funcionar: No arquivo original após criado o projeto o mesmo está desta forma: //{$define UNIGUI_VCL} // Comment out this line to turn this project into an ISAPI module' {$ifndef UNIGUI_VCL} library {$else} program {$endif} HelloWorld; Altere para: //{$define UNIGUI_VCL} // Comment out this line to turn this project into an ISAPI module' {$ifndef UNIGUI_VCL} {$E dll} library {$else} {$E exe} program {$endif} HelloWorld; e caso você deseja gerar o EXE, segue: {$define UNIGUI_VCL} // Comment out this line to turn this project into an ISAPI module' {$ifndef UNIGUI_VCL} {$E dll} library {$else} {$E exe} program {$endif} HelloWorld; unigui.rar1 point